Osprey Modelling • 41
Brett Green
Consultant editor Robert Oehler • Series editors Marcus Cowper and Nikolai Bogdanovic
Introduction
Getting started with tools
Before you begin
Choosing your model • Reference and research • Ready to get going
Building your model
Removing parts from the sprue • Glues
Detailing your model
Resin and photo-etched parts • Scratch-building
Filling and sanding
Which putty? • Sanding techniques
Painting and markings
Types of paint • Paintbrushes • Airbrushes and air sources
Weathering
Pre-shading • Post-shading • Diffusion • Washes • Pastels • Exhaust and cordite stains • Rust • Chipping
Finishing details
Dealing with clear parts • Protective finishes • Working with aerial wires • Displaying your model
Glossary
Building scale model aircraft is an absorbing pastime that can encompass a broad range of interests and skills. A proficiently created scale model can vividly evoke a key moment in history, and be an attractive addition to a mantelpiece or display cabinet. Despite competition from hi-tech leisure pursuits and the spiralling cost of mainstream manufacturing, the hobby of scale aircraft modelling has reached a pinnacle of variety and quality. Thanks to new short-run plastic injection moulding technologies and the superiority of resin details, modellers in the 21st century can build impressive replicas of almost any military aircraft that has ever taken to the sky. With the emergence of the internet, scale modellers now have access to technical and historical resources that earlier generations could only dream of. It has also put them in real-time contact with other modellers and historians across the globe. For all of these reasons, there has never been a better time to build plastic models.
The hobby of scale aircraft modelling stretches back to the 1930s. Skybirds of Britain was the first manufacturer to offer a range of wooden aircraft models in a constant scale. Their chosen size, 1/72nd, is still one of the most popular scales today. Around 1935, another British company, FROG, employed a new material known as cellulose acetate, originally used as a replacement for highly flammable cellulose nitrate film stock, for detail parts on its wooden flying model aircraft. FROG was an abbreviation for ‘Flies Right Off the Ground’, a reference to its flying models. In late 1936, FROG launched its brand-new Penguin range of static plastic scale aircraft, appropriately named after a flightless bird. These early plastic assembly kits proved immediately popular. Even in the first years of production, FROG Penguin released some ambitious kits, including the huge Short Empire flying boat in 1938. FROG Penguin also offered built-up kits, assembled by workers at their factory. These pre-built models were highly soughtafter luxury items, worth several weeks average wage. Even in these pioneering days, model aircraft were not solely ‘toys for boys’.
Airfix sprang onto the model scene in 1953 with their 1/72nd-scale Spitfire Mk I. In 2006, Airfix released their latest Spitfire kit, a Mk IXc/XVIe in 1/48th scale. Here, the new Airfix Spitfire IXc is finished in the markings of 453 Squadron RAAF.
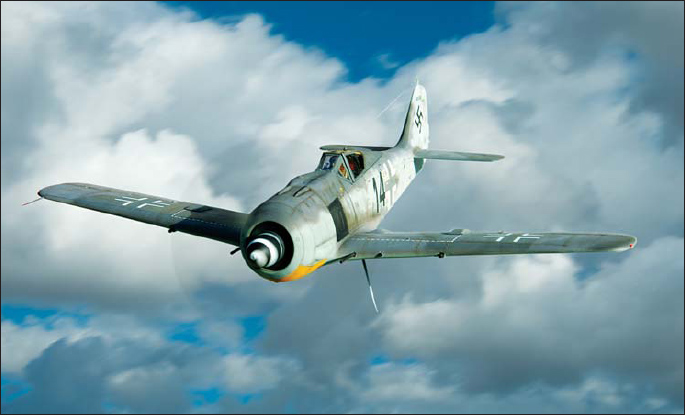
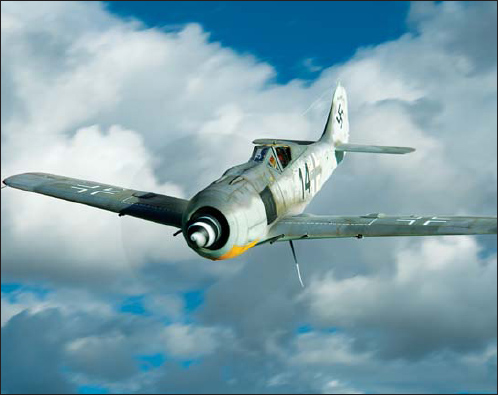
Japanese model companies set new standards for detail and moulding quality from the late 1980s until the mid 1990s. This is a more recent example from Tamiya, their 1/48th-scale Focke-Wulf Fw 190 A-8/R8. This model has been fitted with a small motor to spin the propeller.

The cottage industry is responsible for some esoteric and interesting kits. This is Freightdog Models’ all-resin 1/72nd-scale Saunders Roe P177R, an aircraft that never made it past the first stages of manufacture. As a hypothetical model, however, this example is in service with 74 (Tiger) Squadron RAF.
The outbreak of war in Europe in 1939 diverted the focus of manufacturing to military production. Throughout the war, FROG Penguin played an important role as manufacturer of increasingly accurate, constant-scale identification models of Allied and Axis aircraft.
At the close of hostilities, FROG resumed the manufacture of kits, and by the beginning of the 1950s was joined by the iconic modelling brands Airfix (in the United Kingdom) and Monogram (in the USA). By now, scale aircraft model kits were manufactured using the same injection-moulding technology still employed today. 1/72nd scale remained the most popular constant scale, but new scales emerged during the 1950s, 1960s and 1970s, including 1/48th, 1/32nd and 1/24th.
The 1960s and 1970s were the heyday for plastic models. In this era, a time before video games and multi-media entertainment, building plastic models was a mainstream hobby for children and a significant niche interest for adult aviation enthusiasts. However, the oil crisis of the 1970s increased the price of model kit raw materials, and the following decade saw a downturn in the fortunes of the traditional European and American model companies. In the Far East, though, Japanese brands such as Tamiya and Hasegawa were starting to have a big impact on the global modelling community, one that continues to this day. In more recent years, the emerging economies of Korea and China have started to make a significant contribution to mainstream model releases.
In this book, we will outline the tools and techniques that you will need to build a model straight from the box, and some other accessories to use when you are feeling a bit more ambitious. We will also describe techniques for building, painting and weathering your model aircraft. The text will summarize the theory of scale modelling along with some technical background information, while practical techniques are demonstrated and described in the photos and their accompanying captions.
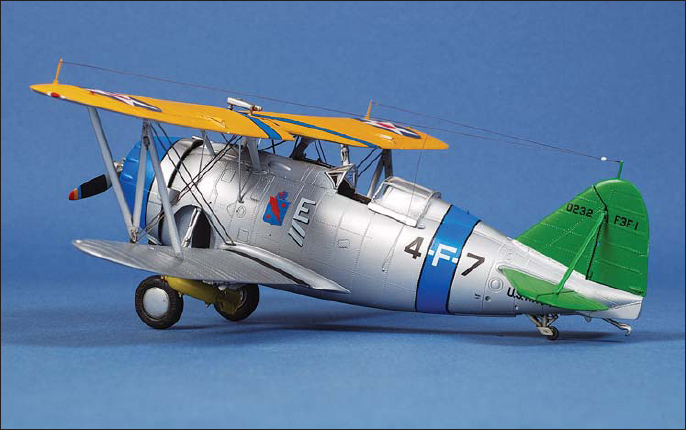
Even mainstream kits can include multi-media parts. Accurate Miniatures’ 1/48th-scale Grumman F3F-1 supplies pre-cut photo-etched flying wires as rigging.
A modeller’s workspace will consist of different environments for different people. Some may be lucky enough to have a dedicated desk, bench or even an entire room for their hobby. Others will need to share space with other members of the household. Regardless, the workspace of all scale modellers should share some common attributes: a clear space on which to work, good lighting and adequate ventilation.
Some of the glues, paints and thinners that you use may be toxic, so make sure that your workspace is close to a window with good airflow. If you are working in a common area of your house, you may choose to organize separate workspaces for different tasks. For example, you might prepare and assemble your kit indoors, but move to the garage when spraying smelly or potentially toxic paints.
Try to set up your workspace under strong light or near a bright window. Ideally, artificial light should be daylight balanced to ensure that your paint job turns out the way you expect. Unbalanced fluorescent lighting can give you a misleading impression about colours. If there is insufficient light, you can purchase a lamp for your workspace.
Organizing your workbench is a very personal matter. The workspace on my desk is covered with a large white blotting pad. This protects the surface of the desk from glue, paint and accidental gouging. Most plastic parts are easy to see on the white paper too. When the paper is dirty, torn or obscured with paint, it is simply thrown away and a new piece is put in its place. Next to the blotting pad I have a self-healing vinyl cutting mat. A metric grid is printed on top of this green mat, making it a useful aid for measuring and aligning parts. This is mainly used as a base for cutting and slicing plastic parts. I keep a small black Perspex tile close at hand as a hard platform for cutting photo-etched and hard parts. To the other side of the blotting pad is a paper artist’s palette. I use this mainly for blending oil paints and testing mixed colours.
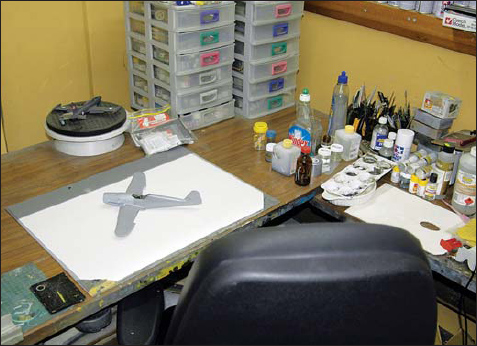
An ideal work space for your modelling.
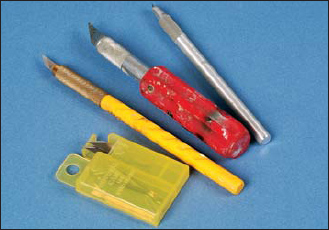
One of the essential tools for any modeller is a good quality knife with replaceable blades. The most common hobby knife is the X-Acto. This has been fitted with an optional (red) handle to improve grip and also to prevent the sharp knife rolling off the modelling desk. I prefer the slimmer Olfa art knife AK-1 (with the yellow handle).
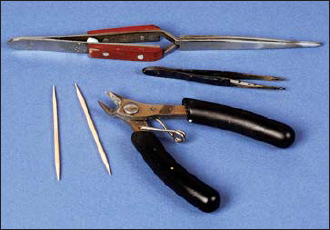
A sprue cutter is another indispensable tool in the modeller’s armoury. A good quality cutter will last a long time. Also shown here are some helpful picking tools – a pair of tweezers, a hemostat (effectively a large pair of self-closing tweezers) and toothpicks, which can be used with a small blob of Blu-Tac to pick up and place tiny plastic and photo-etched parts.
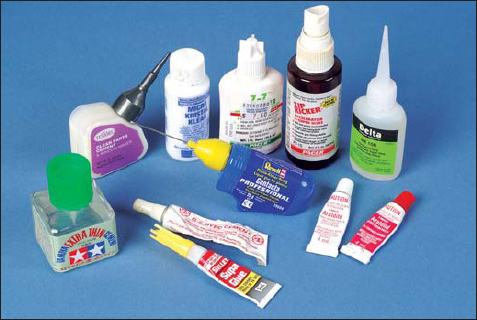
A wide range of adhesives is available to plastic modellers. Many have very specific purposes. The two liquid polystyrene cements seen here – from Tamiya and Revell – will only work on plastic parts. Resin and photo-etched parts may be secured using superglue. The tube variety is thicker, and therefore more suitable for filling. Accelerators and debonders are also available for superglues.
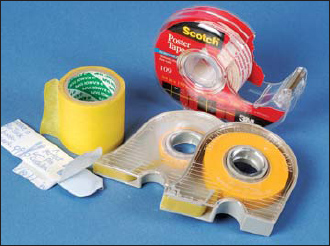
Masking tape is available in many forms and sizes. Tamiya offers a range of tapes from 6mm to 40mm wide. This is flexible yet strong, and its adhesive leaves no residue on plastic parts or paint. Blu-Tac is another helpful aid for temporarily holding parts in place, or as a versatile masking media.
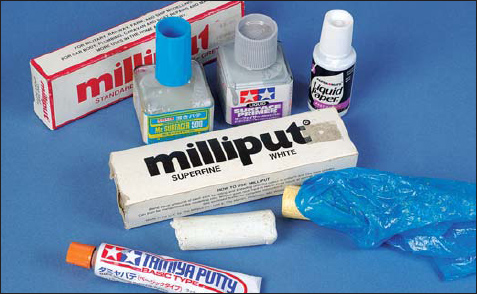
Even the best quality model is likely to need some form of filler. Here are the main categories required by modellers: tube putty, two-part epoxy putty and surfacers. Tube putty and surfacers may be used straight from their containers, but two-part epoxies such as Milliput must be thoroughly mixed in equal quantities. Liquid paper is a useful filler of fine gaps.
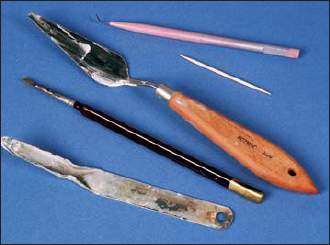
Here are some of the tools that might be used to apply and shape putty. The dental spatula and toothpick at the top of the photo are best for small quantities of putty, while the artist’s trowel would be reserved for large areas. My favourite putty trowel is actually a common staple remover, seen at the bottom of this photo. A damp paintbrush is useful for blending and shaping epoxy putty.
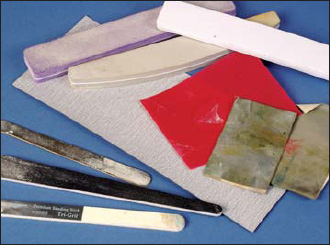
Sanding and polishing apparatus is also critically important. Here we can see MasterCasters’ sponge sanders (top) for coarse to fine sanding jobs, Tamiya abrasive paper for those hard-to-reach areas or large surfaces, Micro Mesh cloths for final sanding and polishing and a selection of sanding sticks, including a Squadron Tri-Grit stick.
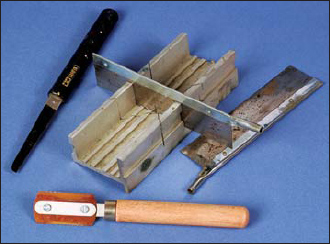
A saw is the best choice of tool if a plastic or resin part requires a long or deep cut. The two large blades are from X-Acto. These are quite rigid and may be used with a mitre box to ensure precise cutting angles. The Tamiya saw has a longer, more flexible blade. At the bottom of this photo is a razor saw. This will make very short work of cutting plastic and resin.
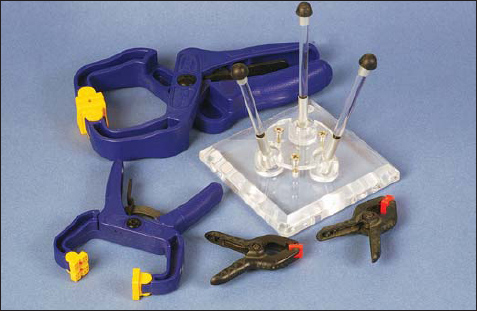
Clamps and stands will hold model parts in place while glue sets, and will free up your hands for delicate assembly.
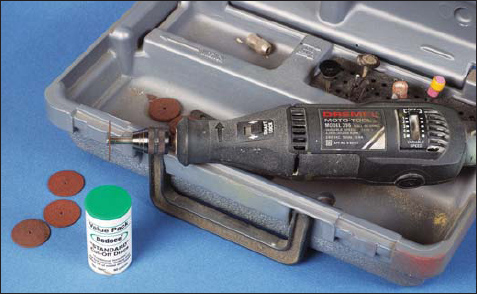
If you are planning to work on kits with high resin content frequently, a motor tool will be a good investment. This is a Dremel motor tool, which offers an enormous range of optional accessories for drilling, cutting, grinding and polishing.
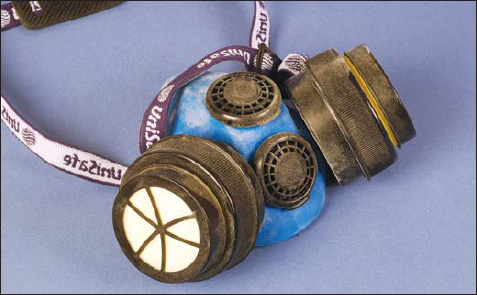
A ventilator mask should be a compulsory companion for a motor tool. Resin dust is highly toxic. A simple ventilator mask from your local hardware store will prevent fine resin dust particles from entering your lungs.
Your modelling desk will be populated with a variety of tools. There are literally hundreds of tools available for modellers, but some of the essentials are listed below. This basic tool set will be enough to let you build a mainstream plastic model kit straight from the box.