
Table of Contents
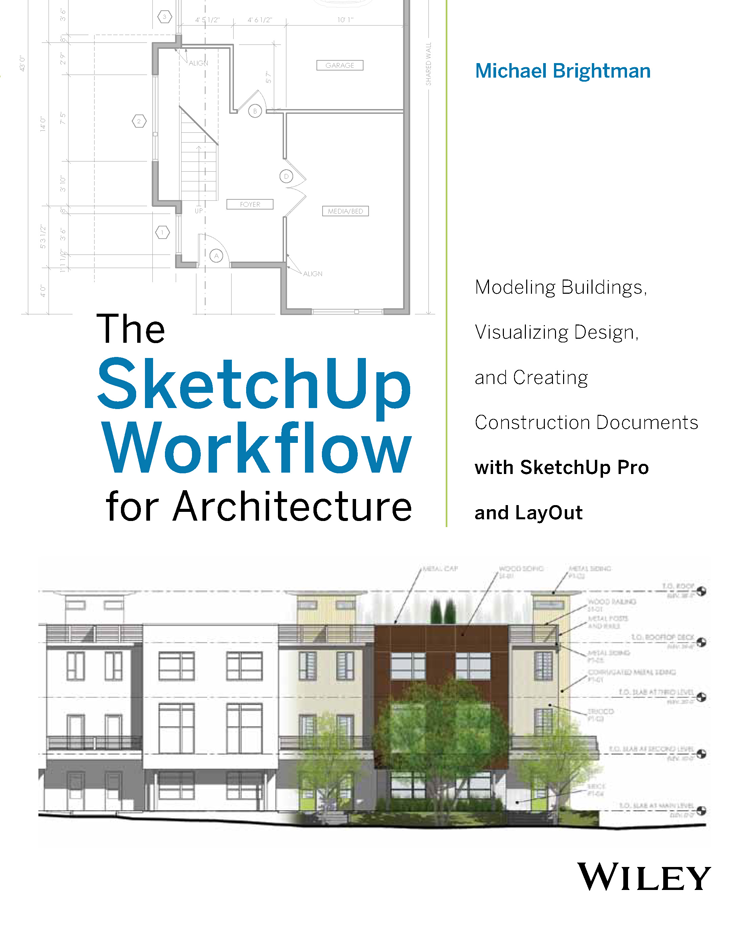
Cover
PART I: Starting the Flow
Chapter 1: Introduction
The Workflow
Who Should Read This Book?
What’s in This Book?
What Are the Prerequisites?
Free SketchUp or SketchUp Pro?
Online Content
Mental Preparation
SketchUp Portfolio
Chapter Points
Chapter 2: Building Information Modeling
What Is BIM?
SketchUp and LayOut as BIM
Filling in the BIM Blanks
The SketchUp Outlook
Chapter Points
Chapter 3: Project Management
Folders and Files
Cloud Storage
Archiving
Chapter Points
PART II: SketchUp
Chapter 4: SketchUp Basics
Five Core Concepts
Leveraging SketchUp
Creating Geometry
Advanced Inferencing
Organizing Geometry with Containers
Section Planes
Layers, Styles, and Scenes
Chapter Points
Chapter 5: The Professional’s SketchUp Template
Base Template
Model Info
Standard Layers
Styles
Utility Scenes
Chapter Points
Chapter 6: The Professional’s SketchUp Environment
Toolbars
Dialogs
System Preferences
Chapter Points
Chapter 7: SketchUp Collections
Material Collection
Component Collections
Styles Collection
Chapter Points
Chapter 8: Ruby Scripts
Find Ruby Scripts
Installing Ruby Scripts
Using Ruby Scripts
Recommended Ruby Scripts
Chapter Points
PART III: LayOut
Chapter 9: Introduction to LayOut
What Is LayOut?
Why LayOut?
Chapter Points
Chapter 10: The LayOut Interface
Getting Started
Main Toolbar
Document Setup
Preferences Window
Inspectors
Chapter Points
Chapter 11: The Professional’s LayOut Environment
New Presentation
System Preferences
Custom Toolbars
Trays
Basic LayOut Template
Chapter Points
Chapter 12: LayOut Tools
Navigating LayOut
Drawing Tools
Annotation Tools
Modification Tools
Chapter Points
Chapter 13: LayOut Collections
Templates
Scrapbooks
Using Collections
Chapter Points
Chapter 14: Inserting Content
Working with SketchUp Models
Working with Images
Working with Text
Chapter Points
Part IV: The Architectural Design Process
Chapter 15: Site Analysis: Digital Site Survey
Geo-Location
Site Plan
Site Section
Final Drawings
Chapter Points
Chapter 16: Site Analysis: Building Context
The Project Site
Finding Nearby Buildings
Geo-Modeling
LayOut Diagrams
Chapter Points
Chapter 17: Site Analysis: Documenting an Existing Building
The Project
Recording Field Notes
The As-Built 3D Model
Working with Existing CAD Drawings
Chapter Points
Chapter 18: Schematic Design
Remodel Design
Project Types
Modeling Strategy
Objects
Exporting to CAD
Chapter Points
Chapter 19: Design Development Rendering
Populating a Scene
Rendering in SketchUp
Photorealistic Rendering
Chapter Points
Chapter 20: Construction Documents
Crucial Concepts for Documentation
Drawings
Annotations
Chapter Points
Index
For my mom, Becky Yovich, in appreciation of her infinite love, support, and encouragement
Cover image: Courtesy of Michael Brightman
Cover design: Anne-Michele Abbott
This book is printed on acid-free paper.
Copyright © 2013 by John Wiley & Sons, Inc. All rights reserved
Published by John Wiley & Sons, Inc., Hoboken, New Jersey
Published simultaneously in Canada
No part of this publication may be reproduced, stored in a retrieval system, or transmitted in any form or by any means, electronic, mechanical, photocopying, recording, scanning, or otherwise, except as permitted under Section 107 or 108 of the 1976 United States Copyright Act, without either the prior written permission of the Publisher, or authorization through payment of the appropriate per-copy fee to the Copyright Clearance Center, 222 Rosewood Drive, Danvers, MA 01923, (978) 750-8400, fax (978) 646-8600, or on the Web at www.copyright.com. Requests to the Publisher for permission should be addressed to the Permissions Department, John Wiley & Sons, Inc., 111 River Street, Hoboken, NJ 07030, (201) 748-6011, fax (201) 748-6008, or online at www.wiley.com/go/permissions.
Limit of Liability/Disclaimer of Warranty: While the publisher and author have used their best efforts in preparing this book, they make no representations or warranties with the respect to the accuracy or completeness of the contents of this book and specifically disclaim any implied warranties of merchantability or fitness for a particular purpose. No warranty may be created or extended by sales representatives or written sales materials. The advice and strategies contained herein may not be suitable for your situation. You should consult with a professional where appropriate. Neither the publisher nor the author shall be liable for damages arising herefrom.
For general information about our other products and services, please contact our Customer Care Department within the United States at (800) 762-2974, outside the United States at (317) 572-3993 or fax (317) 572-4002.
Wiley publishes in a variety of print and electronic formats and by print-on-demand. Some material included with standard print versions of this book may not be included in e-books or in print-on-demand. If this book refers to media such as a CD or DVD that is not included in the version you purchased, you may download this material at http://booksupport.wiley.com. For more information about Wiley products, visit www.wiley.com.
Library of Congress Cataloging-in-Publication Data:
Brightman, Michael, 1980-
The SketchUp workflow for architecture : modeling buildings, visualizing design, and creating construction documents with SketchUp Pro and LayOut / Michael Brightman. — 1
pages cm
Includes index.
ISBN 978-1-118-29014-9 (pbk.); ISBN 978-1-118-41982-3 (ebk); ISBN 978-1-118-42131-4 (ebk); ISBN 978-1-118-57229-0 (ebk)
1. Architectural drawing—Computer-aided design. 2. Architectural design—Data processing. 3. SketchUp. I. Title.
NA2728.B75 2013
720.28’40285668—dc23
Printed in the United States of America
10 9 8 7 6 5 4 3 2 1
Get ready to elevate your SketchUp skills and design workflow to the highest radical extremes of efficiency. The SketchUp Workflow for Architecture contains tips, tricks, and strategies for modeling in SketchUp, as well as methods to leverage SketchUp and LayOut during every step of the design process. Let’s start with a few tips on how to get the most out of this book, how BIM plays a part in the SketchUp workflow, and how to effectively manage a PROJECT folder.
This book is the missing set of standards for SketchUp and LayOut. The SketchUp Workflow for Architecture provides a flexible, clear set of rules for organizing any type of building project in SketchUp: renovation, new construction, residential, commercial, high-rise, low-rise, industrial. It is up to the user to process these techniques and strategies, and then apply them to projects. In this chapter you will pick up a few tips on how to best absorb the information and get the most out of this book.
This book covers advanced concepts performed with advanced operations. These are not workarounds; rather they are clever ways to use SketchUp to expedite the design process. With The SketchUp Workflow for Architecture and some practice, you will be able to:
The term “workflow” loosely describes the collection of tools designers use and the order in which they use those tools to produce a final design. Designers use many different tools and software to produce their final products, which are typically new, built environments; some of many initial products are construction documents.
Many different workflows can be used to design and create construction documents; however, the best workflows minimize the use of several different softwares because something is always lost during translation between programs.
The workflow explained in this book uses SketchUp and LayOut for every phase of the design process. You can use other programs to supplement SketchUp, but SketchUp Pro and LayOut are at the core of this process. For example, you could use an image editor to post-process exports and modify textures, but you will simply be using the image editor to complement SketchUp. As another example, you could use a spreadsheet program for schedules, but keep all of your drafting in SketchUp and LayOut.
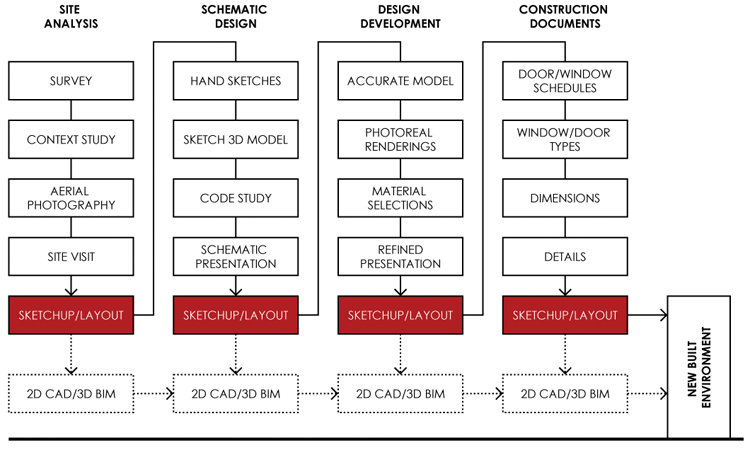
This workflow is not a regimented design process; you can adapt all or part of it and use the organizational and design tips. The process of moving from sketches to construction documents is expedited by The SketchUp Workflow for Architecture (Figure 1-1).
Figure 1-1: The SketchUp Workflow for Architecture
The evolution of a client’s vision to an actual building involves many small steps and phases. There is no right or wrong way to produce a design, but there are critics out there who will judge your designs. The most important audiences, however, are your clients. The more time you spend on the design, the better. The SketchUp Workflow for Architecture is focused on design and will ultimately provide more time for you to explore real designs in three dimensions.
Anyone interested in mastering SketchUp will benefit greatly from this book—architects, landscape architects, designers, interior designers, contractors. Large firms, one-man-shows, and every office size in between can benefit from this book. If you are using SketchUp to design built space, you should practice The SketchUp Workflow for Architecture. Most sizable firms already have a design workflow with 3D Building Information Modeling (BIM) software and standards in place. BIM is excellent for huge projects with extensive scheduling and square footage, but does it really help on the smaller projects? For large firms, The SketchUp Workflow for Architecture will fit in where a bloated, over-featured software suite is not necessary. The techniques in this book give you the freedom to simplify your model by including only the building information you need to get the project done on time.
On the other end of the spectrum is the one-man-show looking to cut overhead. When compared to other popular design and documentation programs available on the market, this workflow is very inexpensive. By adding a few plugins to SketchUp Pro, you’ll have full capability to efficiently design, draft, render, analyze, and document any project.
Anyone who reads this book will take away excellent organization and problem-solving strategies for SketchUp. The techniques presented will help any designer create more engaging and accurate 3D models that are easily shared across several platforms.
The advanced concepts and operations covered in this book are organized into four separate and distinct parts.
Part I takes care of some administrative tasks and disclaimers common in an instructional software book. In Part I, you will learn the benefits of using SketchUp Pro and LayOut, and you will be introduced to the power of this system. Also, you will be exposed to a new way of thinking about BIM. Part I wraps up by explaining folder and file organization techniques that will help keep your projects running smoothly.
In Part II you will learn the basic, intermediate, and advanced SketchUp skills necessary to complete the exercises in this book. You will also tune your SketchUp environment for professional use. You will learn to create utility styles and scenes, custom layers, and ultimately your own custom default template. Even if you are an experienced SketchUp user, you will benefit from the refresher and most likely will develop a new understanding of the old features.

Part III is an “everything you need to know” guide for LayOut. At times, this section may read more like a manual than a tutorial because it explains every menu, dialog, and setting you will come across in LayOut. It also contains tutorials for creating custom scrapbooks and templates. Study this part closely even if you have used LayOut previously. The skills you learn in Part III will make you a fast and effective LayOut draftsman.

The traditional architectural design process consists of five major phases: schematic design, design development, construction documents, bidding and negotiations, and construction administration. The design process presented in Part IV has been whittled down to four main phases: site analysis (SA), schematic design (SD), design development (DD), and construction documents (CD).
Although they are very important steps in the design process, this book will not directly address construction administration (CA), or bidding and negotiation (BN). SketchUp can be used for cost estimating, but does not typically play a major role in negotiating numbers with a contractor. SketchUp can also play a role in CA, but the skills you will learn in the other four phases can be easily applied to the construction administration phase.
This is an extremely advanced book. It assumes that you are already familiar with many of the tools and basic functions in SketchUp, including groups, components, edges, surfaces, dividing surfaces, styles, layers, and scenes. You also need to know and understand basic computer terms and concepts such as right-click, left-click, windows, files, folders, drop-down menus, zipped, unzip, extract, etc.
To make the most of this book, you should have some experience with SketchUp, but even if you don’t you can still benefit. You don’t have to have any experience with LayOut. Parts II and III cover the essential skills you’ll need to complete the advanced exercises in Part IV.
The following resources will help you make the most of this book.

These classes are helpful, but they are not required to utilize The SketchUp Workflow for Architecture. Everything you need is included in this book.
The free version of SketchUp is for hobbyists; it is intended for the weekend warrior designing a deck or a student working on a school project. The free version has been stripped of many capabilities that are needed to create professional presentations; it lacks exporters for 3D models and can’t create high-resolution images or animations, features that professionals need.
SketchUp Pro contains everything a professional needs to create engaging and precise presentations that accurately represent their designs. Using the Pro version, you can present and explain 3D designs in LayOut (2D page-creation software included with SketchUp Pro), use several export options to share work (including .dwg format), and create HD animations and high-resolution renderings. Figure 1-6 compares the features of SketchUp and SketchUp Pro.
Figure 1-6: Features of SketchUp and SketchUp Pro

Many of the exercises in this book require digital files to illustrate certain points in the tutorials. You can download all of the class files for the entire book at http://www.suexch.com/TSWFA. Once you have downloaded the file, extract the folder and all contents to your desktop or an appropriate project folder (or to the TEMP folder, see Chapter 3, “Project Management”).
Additional models, case studies, title blocks, scrapbooks, project models, and a discussion forum for professional users are available at www.suexch.com. This site complements this book and expands on advanced topics.
SketchUp is fast, fun, and intuitive—but only after a lot of practice! SketchUp is not easy. SketchUp marketing has done an excellent job of publicizing the simple use of SketchUp. It is extremely approachable in that you can open the program, click on the Line tool, and start drawing. Shortly after you create your first surface, the Push/Pull tool will enable you to quickly generate massive amounts of 3D geometry. However, once you start modeling with these simple tools, you’ll quickly have more questions than answers. This lack of knowledge coupled with the desire to perform advanced operations can cause frustration.
Mentally prepare yourself to learn this software and the workflow presented in this book. Push aside any preconceived notions of “3D for everyone.” Ignore your colleague’s comments about SketchUp being easy to learn, simple to use, and not nearly as powerful as other 3D programs. SketchUp is similar to other CAD programs in that you need to spend a significant amount of time learning to use it in order to fully leverage it. Accept the fact that any program is easy to open and play with; but to fully understand any 3D application, including SketchUp, you’ll need to fully invest your time, patience, and effort.
The examples in Figures 1-7 through 1-17 are just some of the types of models and documents you can create using SketchUp.
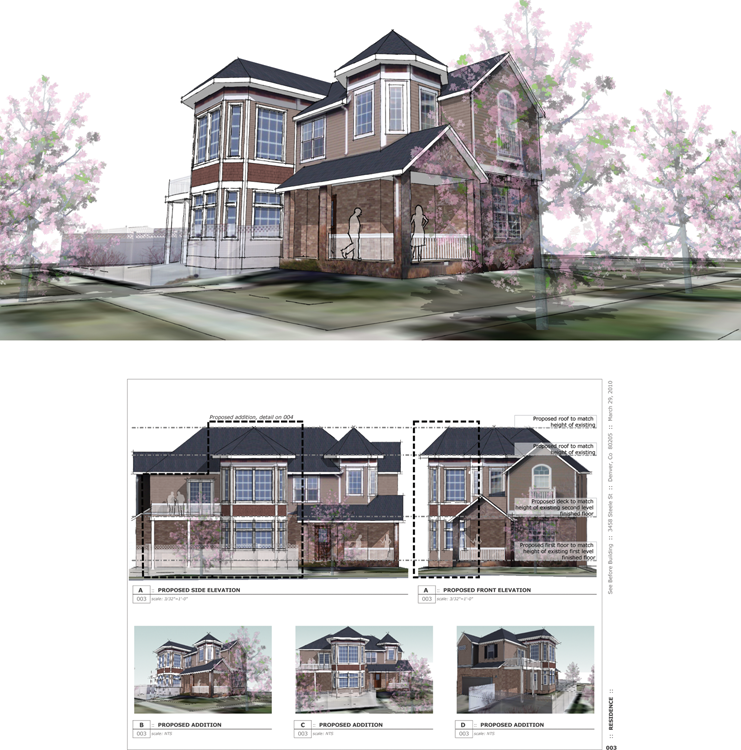
Figure 1-7: SketchUp Pro and LayOut have the full capability to produce large sets of construction documents. Office Remodel designed by Bill Morgan, Morgan Design Associates; SketchUp model and drawings by Michael Brightman
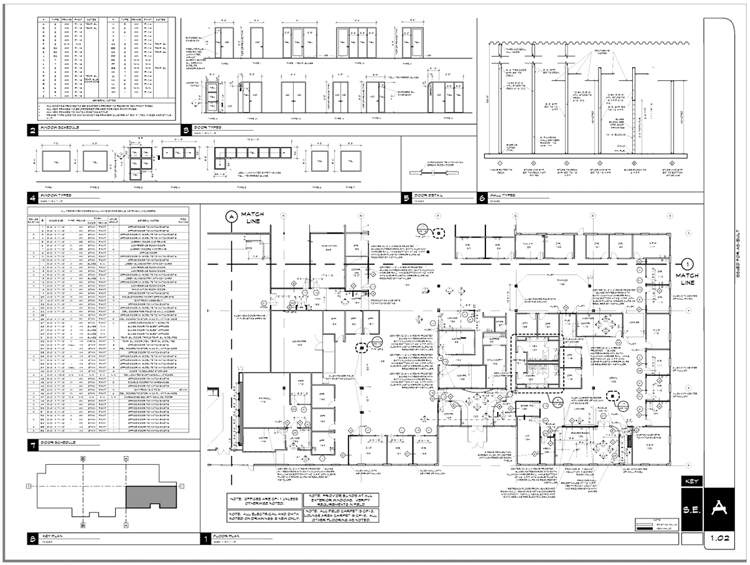
Figure 1-8: Create a winter scene by lightening and desaturating texture images. Timbercreek at Okemo House. Designed by Bensonwood Homes; model built by Michael Brightman

Figure 1-9: SketchUp is as precise as many other CAD programs, precise enough to create as-built 3D models like the one shown. Denver Loft 3D as-built model; space measured and model built by Michael Brightman

Figure 1-10: Exterior perspective. “Greenness” concept house design by Phil Lehn, Lehn Design Collaborative; model built by Michael Brightman

Figure 1-11: Modeling a house inside and out lets you fully explore the interactions of plan and elevation. “Greenness” concept house. Designed by Lehn Design; model built by Michael Brightman

Figure 1-12: Building a SketchUp model of a “model home” costs drastically less than building the real thing. “The Monticello” digital spec house. Designed by Luxury Builders; model built by Michael Brightman

Figure 1-13: By layering 2D and 3D elements, you can make expansive sites look convincing without overloading your machine. “Sterling Pointe” at Winter Park, Colorado. Designed by Wintergreen Homes LLC; model built by Michael Brightman

Figure 1-14: Timbercreek at Okemo spec house. Designed by Bensonwood Homes; model built by Michael Brightman

Figure 1-15: This lobby model was built in SketchUp and rendered in Twilight Render to add lights, soft shadows, and reflections. Design by Carol Freeman, Freeman Architecture; SketchUp model and photorealistic rendering by Michael Brightman

Figure 1-16: Use LayOut to turn 3D SketchUp models into 2D descriptive annotated plans. Unit plan designed by Stephen Levin, Helix Architecture; SketchUp model and drawings completed by Michael Brightman
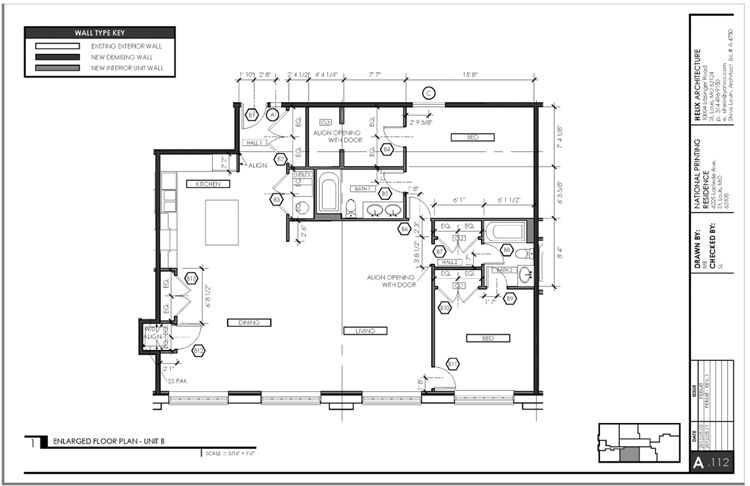
Figure 1-17: By combining geomodeling techniques and accurate modeling strategies, you can quickly and accurately communicate realistic design possibilities. Proposed Lowry House addition. Design and model completed by Michael Brightman
Building Information Modeling (BIM) is the latest buzz in architectural design and drafting. Is BIM a revolution or just the way the industry works these days? In this chapter, you will be encouraged to contemplate and challenge the popular assumptions and standard definition of BIM. By doing so, you should realize that integrating the benefits of BIM into your workflow is easier and cheaper than you ever thought.
“Building Information Modeling (BIM) is a digital representation of physical and functional characteristics of a facility. A BIM is a shared knowledge resource for information about a facility forming a reliable basis for decisions during its life-cycle; defined as existing from earliest conception to demolition.” (National BIM Standard--United States) A building information model (BIM) is an intelligent model that integrates design, visualization, simulation, and collaboration into one process. The model is a physical representation, but it can also be informative. The model not only shows a client what a building will look like, but it also gives the client and designer a better understanding of how the building will function. A BIM is essentially a shared, digital building prototype that helps everyone on the design team make better decisions.
A building information model is intended to be used during every phase of the design process, and by every member on the team.
Architects typically create the main model and then share it with consultants who use the BIM to ensure that their trades don’t interfere with the building’s function or other trades. For instance, a duct physically can’t run through a beam. It is better to catch issues like this on the computer rather than in the field. This BIM feature is commonly referred to as clash detection.
Building owners and facility managers can also use the BIM after the building is complete. For example, a BIM could help them track down the source of a stained ceiling by locating plumbing lines or by indicating possible weaknesses in the roof membrane.
BIM is a concept not a software program. However, there are software programs that use the BIM concept to execute the design process. There is no official BIM features list, but here are a few popular features that most people expect to find in a BIM program:
Coming as a surprise to most, SketchUp and LayOut contain many of the most popular BIM software features. With the workflow presented in this book, SketchUp and LayOut pull the best features from each of the most popular drafting platforms (2D CAD and 3D BIM). Using this workflow, you can incorporate BIM’s fundamental features into your projects. This section outlines what makes SketchUp and LayOut such a powerful design and documentation tool and explains why it is a unique design and documentation method.
Some of the advantages of using SketchUp and LayOut as a design and documentation method are listed here:
Figure 2-1: Office remodel. Enlarged ceiling plans describe the two soffit levels of the lounge area. These 2D drawings were pulled dynamically from the 3D model. All of the drafting and modeling were completed using SketchUp Pro, LayOut, and The SketchUp Workflow for Architecture.
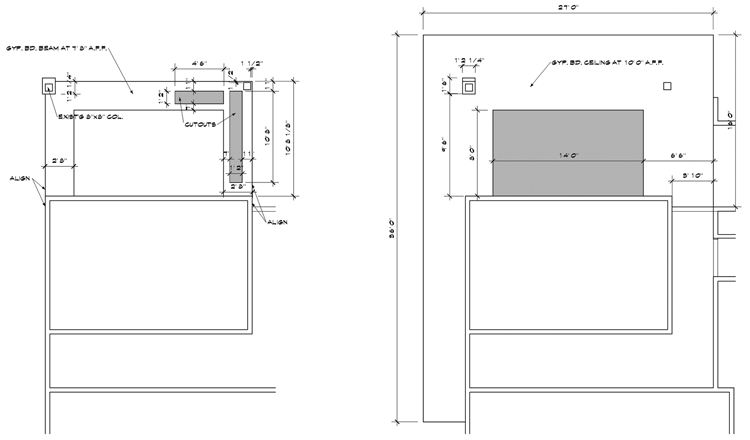
Figure 2-2: Office remodel. All 2D drawings describing this unique ceiling condition are dynamically linked to this 3D model.

Figure 2-3: Office remodel. Sheet A1.02 contains a partial floorplan, a door schedule, door types, a window schedule, window types, wall types, and a key plan.

Figure 2-4: Office remodel. These enlarged plans show detailed locations of fixtures and other information that will not fit on a building plan.
Figure 2-5: Office remodel. Sheet A2.09 contains a partial reflected ceiling plan, enlarged reflected-ceiling plans, details, and a key plan. A reflected ceiling plan is created by cutting the model similar to a plan, but looking up at the ceiling.

Figure 2-6: A residential project in SketchUp (top). The same residential project in 2D CAD (bottom).

Some of the disadvantages of using SketchUp and LayOut as a design and documentation method include:
You can use plugins to extend SketchUp’s BIM features. Third parties are creating plugins that expand the SketchUp universe and provide features that fill the BIM voids. Although the plugins listed in this section are not officially endorsed by or included in The SketchUp Workflow for Architecture, they provide a great place to begin your search to expand BIM capabilities.
Cost Analysis
Energy Analysis
HVAC
Parametric Modeling
4D Timeline
Photorealistic Rendering and Raytracing
In Figure 2-7 and Figure 2-8, the drafting and modeling were completed using SketchUp Pro, LayOut, and The SketchUp Workflow for Architecture.
Figure 2-7: Sheet A3.16 contains interior elevations and a perspective view, all pulled from the same 3D model.

Figure 2-8: Utility styles display additional layers of information contained in a 3D model. This image represents a scope diagram, where all existing objects are shown in gray and all new objects are shown in green.

For a few good years, Google owned SketchUp and supported it. Among other features, Google SketchUp introduced styles, the Follow Me tool, MatchPhoto, integration with Google Maps and Google Earth, and a huge leap forward with LayOut. The Google years were exciting at first, but after SketchUp 7 Google seemed to lose interest in the project and deprioritized it.
Why would such a cool company do this to such a cool program? Perhaps it was because lighter cloud programs such as Google Building Maker can create 3D models for Google Earth, which was one of the original reasons Google purchased SketchUp. Another possibility is that taking on the architectural drafting industry juggernauts didn’t fit into Google’s mission statement, which is to organize the world’s information and make it universally accessible and useful. Either way, SketchUp was put on the back burner for several years during a period of minimal releases and minimal new features. Nobody likes a breakup, but it was time for SketchUp to tell Google, “It’s not me, it’s you.”
Google handled the breakup with maturity and sensitivity to the loyal SketchUp community by finding a buyer who really appreciated the product. Trimble, the new owners, might not have the allure and mystique Google has, but they do have some radical hardware. Trimble creates GPS devices for automating farm equipment and efficiently fertilizing crops. They build handheld devices for construction management. Interestingly enough, Trimble creates 3D laser scanners. These high-tech machines can be placed in a room and within minutes they can generate an accurate as-built 3D model of the space. Yet another intriguing product that Trimble owns is Tekla, a BIM program aimed toward engineering. Now, with the purchase of SketchUp, they possess a wildly popular 3D platform that architects embrace. SketchUp may have been close to extinction, but now its future looks great.
Figure 2-9: An equation that inspires speculation

Unwavering, relentless organization is essential to a successful project. Just like a messy desk, a messy PROJECT folder can cause miscommunication, lost work, and ultimately cost you time and money. The techniques illustrated in this chapter will help you organize your design projects. Keep in mind that this is not a rigid system; the suggested workflow is flexible and can be tweaked to meet your specific needs. In other words, feel free to modify this method any way you see fit to meet your project type and office standards.
Approaching folders and files the same way every time will help your team collaborate efficiently. First, you need to understand some standard ground rules regarding how to organize PROJECT folders. Then you can apply the logic of this system to your PROJECT folders and further develop your own set of standards.
Take a moment to invent an identifying acronym. This shouldn’t be too hard; architects and designers do it all of the time—for example, HOK, RNL, and SOM. Your identifying acronym will be used to name files and many other things that you create in the digital world. This is important, not necessarily from a marketing point of view, but from an organizational point of view so that everyone knows who made the file. The acronym used for the examples in this book is BIC, which stands for Bright Ideas Consultants. Anticipate replacing the “BIC” with your own identifying acronym as you complete the exercises in this book.
Folders contain files and other folders, and they have a strong tendency to become a complete mess. Read the next sentence several times so it is etched into your memory. The contents of a folder should present the fewest number of choices, and all choices should be self-explanatory. That sentence thoroughly describes folder organization logic, and it is the keystone of an organized folder.
All PROJECT folder names should be in capital letters to clearly and concisely describe the folder—for example, OFFICE REMODEL. Ideally, all subfolder names within the project folder will be one word in caps; frequently, subfolder names are abbreviated. For instance, administrative files such as contracts and correspondence will be stored in a folder named ADMIN. Pictures, sketches, and diagrams will be kept in a folder named IMAGES. By capitalizing the file folder names, you are visually separating those folder names from the filenames residing in the same folder.
An efficient filename gives the user as much information as possible without ever looking at the file properties (Figure 3-1).
Figure 3-1: Clear, concise, and informative filename

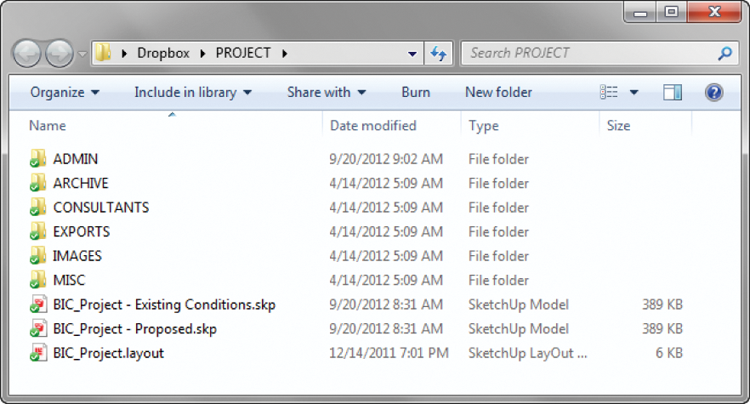
For example, examine the filename BIC_Office Remodel – Existing Conditions.skp. This file was created by Bright Ideas Consultants, is part of the Office Remodel project, illustrates the existing conditions, and opens in SketchUp. By providing this information in the filename, you answer many questions about the file before anyone even tries to open it. Any consultant or member of your team who opens your files will immediately know where the files came from and how to use them.
Only one current version of each file should be stored in the main PROJECT folder. Avoid giving files confusing names that will make sense only at the moment you name it. Do not name files with the words current, best, use this, or delete. These types of filenames do not make it perfectly clear which file in the main PROJECT folder is actually the current file. Vague filenames provide users with ambiguous information, cause confusion, and ultimately lead to duplicated work and lost time. See Figure 3-2.
Figure 3-2: A typical PROJECT folder
By placing your folders in logical places, you help your team keep track of active projects and their associated files. To start organizing your projects, you only need three basic folders: a TEMP folder, an ACTIVE PROJECTS folder, and an ARCHIVE folder. Again, this is not a rigid system; you can customize it to a system that works for you.
One way to keep junk files from accumulating on your machine is to create a place to dump them. Create a TEMP folder on your desktop.
The TEMP folder is for anything that you don’t need to keep. This is a great place to save program installers, quick sketches, and email attachments. Files saved in this folder will not be missed when this folder is emptied. Every month or so, go into the TEMP folder and delete all of its contents. If you wonder whether or not you will need a file, more than likely you should save it in a PROJECT folder rather than save it in the TEMP folder.
On a side note, never save anything onto your desktop. The only items that should be on your desktop are the Recycle Bin, TEMP folder, ARCHIVE folder, ACTIVE PROJECTS folder, and possibly some application shortcuts. Never save files to your desktop. If you just need to use a file briefly, save it in the TEMP folder. If you ignore this rule, your desktop will become a mess (Figure 3-3).
Figure 3-3: A clean desktop is neater and easier to use than a messy desktop.

An active project is one that you access on a daily to weekly basis. The files within the ACTIVE PROJECTS folder change daily. Create a folder on your desktop and name it ACTIVE PROJECTS, or place it on a shared server. Save all current and active projects into your ACTIVE PROJECTS folder using the folder and file naming structures previously described.
An inactive project is a project that has already been invoiced, been paid, and probably won’t be accessed again. Saving all finished work is important, just in case phase two comes around or you need to pull a piece of a model from a past project to use on a current project. Create a folder on your desktop and name it ARCHIVE. Inactive projects should be saved in the ARCHIVE folder on your desktop.
Within the ACTIVE PROJECTS folder, create another folder named RESOURCES. The RESOURCES folder holds all of your components, materials, plugins, scrapbooks, styles, and templates. You can also store Windows Themes, preferences.dat files, fonts, and anything else that you use across all of your machines in this folder. Add a folder for each category as shown in Figure 3-4. Consider prefixing each folder name with your identifying acronym.
Figure 3-4: A typical RESOURCES folder

This section suggests a starting point and system to help you organize your PROJECT folders. A PROJECT folder should contain the following subfolders: ADMIN, ARCHIVE, CONSULTANTS, EXPORTS, IMAGES, and MISC. Your particular projects can include other folders if needed.
The main project files, typically SketchUp and LayOut files, should be stored in the main PROJECT folder with the other project subfolders (Figure 3-5). This will provide easy access to the most frequently used files, which usually have the .skp and .layout filename extensions.
Figure 3-5: A typical PROJECT folder

The ADMIN folder should contain all administrative files. You should save contracts, time sheets, product specification sheets, correspondence, and memos that relate to the project in this folder (Figure 3-6). A safe rule of thumb is that if a file is not graphic in nature, it probably belongs in the ADMIN folder. Typical file extensions found in this folder are .doc, .xls, and .pdf.
Figure 3-6: A typical ADMIN folder

The ARCHIVE folder is used to preserve past versions of all important project files. Typically, you should store only zipped files and zipped folders in the ARCHIVE folder (Figure 3-7). All files should be titled with the naming convention YYMMDD_Files.zip or YYMMDD_Exports.zip.zip.zip