Table of Contents
Figure List
Preface
Acknowledgments
Contributors
Section One: Anatomy
Chapter 1: Anatomy
ANATOMY
Section Two: Preventative Care
Chapter 2: Preventative Care and Vaccinations
PHYSICAL EXAMINATIONS
VACCINATIONS
ANIMAL CARE
Chapter 3: Nutrition
GENERAL NUTRITION
Section Three: Diagnostic Skills
Chapter 4: Laboratory
BLOOD CHEMISTRIES
BONE MARROW EVALUATION
CYTOLOGY
FUNCTION TESTS
HEMATOLOGY
IMMUNOLOGY AND SEROLOGY TESTS
MICROBIOLOGY
PARASITOLOGY
URINALYSIS
Chapter 5: Imaging
RADIOLOGY
Chapter 6: General Medicine
CARDIOPULMONARY
DERMATOLOGY
ENDOCRINOLOGY AND REPRODUCTION
GASTROENTEROLOGY
HEMATOLOGY
INFECTIOUS DISEASES
MUSCULOSKELETAL
NEUROLOGY
ONCOLOGY
OPHTHALMOLOGY
UROLOGY
Chapter 7: Emergency Medicine
Section Four: Patient Care Skills
Chapter 8: Patient Care
PATIENT MONITORING
DRUG ADMINISTRATION
FLUID THERAPY
BLOOD TRANSFUSIONS
OXYGEN THERAPY
Chapter 9: Pain Management
PAIN MANAGEMENT
PAIN MANAGEMENT TECHNIQUES
Chapter 10: Wound Care
WOUND TREATMENT AND BANDAGING
BANDAGING
Chapter 11: Parenteral Nutrition
NUTRITIONAL SUPPORT
PARENTERAL NUTRITION
Chapter 12: Medical Procedures
GASTROINTESTINAL PROCEDURES
OPHTHALMIC PROCEDURES
RESPIRATORY PROCEDURES
UROGENITAL PROCEDURES
Section Five: Anesthesia and Anesthetic Procedures
Chapter 13: Anesthesia
GUIDELINES FOR SAFE ANESTHESIA
PREANESTHETIC
ANESTHESIA
POSTANESTHESIA
VENTILATION
ANESTHETIC DRUGS
Chapter 14: Dentistry
DENTISTRY
ANATOMY
DENTAL INSTRUMENTS AND EQUIPMENT
DENTAL PROPHYLAXIS
COMMON DENTAL DISORDERS
DENTAL RADIOLOGY
EXTRACTIONS
Chapter 15: Surgery
SURGICAL PROCEDURES
SUTURE TECHNIQUES
POSTOPERATIVE CARE PROTOCOL
ALTERNATIVE SURGICAL OPTIONS
Section Six: Complementary and Alternative Veterinary Medicine and Pharmacology
Chapter 16: Complementary and Alternative Veterinary Medicine
COMPLEMENTARY AND ALTERNATIVE VETERINARY MEDICINE (CAVM)
PHYSICAL THERAPY AND REHABILITATION
Chapter 17: Pharmacology
PHARMACOLOGY
ANTIFUNGAL DRUGS
ANTI-INFECTIVE DRUGS
ANTIPARASITIC DRUGS
CANCER/CHEMOTHERAPY DRUGS
CARDIOVASCULAR DRUGS
DERMATOLOGIC DRUGS
GASTROINTESTINAL DRUGS
HEPATIC DRUGS
METABOLIC DRUGS
MUSCULOSKELETAL DRUGS
ANTI-INFLAMMATORY DRUGS
NEUROLOGIC DRUGS
OPHTHALMIC DRUGS
OTIC DRUGS
RENAL/URINARY DRUGS
REPRODUCTIVE SYSTEM DRUGS
RESPIRATORY DRUGS
TOXICOLOGIC DRUGS
Appendix
Glossary
Abbreviations
Bibliography
Supplemental Images
Index
First Edition first published 2003
Second Edition first published 2008
© 2008, Candyce M. Jack and Patricia M. Watson
Blackwell Publishing was acquired by John Wiley & Sons in February 2007. Blackwell’s publishing program has been merged with Wiley’s global Scientific, Technical, and Medical business to form Wiley-Blackwell.
Editorial Office
2121 State Avenue, Ames, Iowa 50014-8300, USA
For details of our global editorial offices, for customer services, and for information about how to apply for permission to reuse the copyright material in this book, please see our website at www.wiley.com/wiley-blackwell.
Authorization to photocopy items for internal or personal use, or the internal or personal use of specific clients, is granted by Blackwell Publishing, provided that the base fee is paid directly to the Copyright Clearance Center, 222 Rosewood Drive, Danvers, MA 01923. For those organizations that have been granted a photocopy license by CCC, a separate system of payments has been arranged. The fee codes for users of the Transactional Reporting Service are ISBN-13: 978-0-8138-1204-5/2008.
Designations used by companies to distinguish their products are often claimed as trademarks. All brand names and product names used in this book are trade names, service marks, trademarks or registered trademarks of their respective owners. The publisher is not associated with any product or vendor mentioned in this book. This publication is designed to provide accurate and authoritative information in regard to the subject matter covered. It is sold on the understanding that the publisher is not engaged in rendering professional services. If professional advice or other expert assistance is required, the services of a competent professional should be sought.
Library of Congress Cataloguing-in-Publication Data
Jack, Candyce M.
Veterinary technician’s daily reference guide: canine and feline / Candyce M. Jack,
Patricia M. Watson; consulting editor, Mark S. Donovan. – 2nd ed.
p. ; cm.
Rev. ed. of: Veterinary technician’s daily reference guide: canine and feline /
Candyce M. Jack, Patricia M. Watson; consulting editor, Mark S. Donovan. C2003.
Includes bibliographical references and index.
ISBN 978-0-8183-1204-5 (alk, paper)
1. Veterinary medicine–Handbooks, manuals, etc. I. Watson, Patricia M. II. Jack,
Candyce M. Veterinary technician’s daily reference guide. III. Title.
[DNLM: 1. Veterinary Medicine–methods–Handbooks. 2. Animal Technicians–
Handbooks. 3. Cat Diseases–Handbooks. 4. Dog Diseases–Handbooks. SF 748
J12v 2008]
SF748.J33 2008
636.089–dc22
2007050954
A catalogue record for this book is available from the U.S. Library of Congress.
This book is dedicated to all the licensed veterinary technicians who are doing their best for the advancement of the field and devoting themselves to providing the best possible care to their animal patients.
A special thanks to our medical editor, Dr. Mark Donovan, for his commitment to our goal and his perseverance to ensure the book presented advanced and accurate information.
Patricia
Special thanks for family, co-workers, and friends who are consistently supporting me to new levels of learning and opportunity. Each of you and your pets are a part of this book and I am grateful for your constant support. Thanks to my coauthor, whose insight, energy, dedication to the veterinary field, and perseverance has made this second edition a reality. And finally, I dedicate this book in special remembrance of my beloved Einstein (1991–2006), whose teeth are immortalized within the pages of this book.
Candyce
With heartfelt gratitude, I thank Dede for her patience and friendship, Linda for her continuous support of my endeavors, Megan for teaching me “you can’t push the river,” and, most important, my incredibly supportive family for the sacrifices they have made to allow me to complete this project.
Figure List
Chapter 1: Anatomy
Figure 1.1 Overall
Figure 1.2 Regional Lymph Nodes
Figure 1.3 Musculature: Lateral View
Figure 1.4 Skeletal: Lateral View
Figure 1.5 Skeletal: Dorsal View
Figure 1.6 Internal Organs: Left Lateral View
Figure 1.7 Internal Organs: Right Lateral View
Figure 1.8 Internal Organs: Ventral View
Figure 1.9 Circulation: Dorsal View of Heart
Figure 1.10 Circulation: Internal View of Heart
Figure 1.11 Circulation: Heart Valves
Figure 1.12 Circulatory: Lateral View
Figure 1.13 Nervous System: Lateral View of Brain
Figure 1.14 Nervous System: Lateral View
Figure 1.15 Urogenital: Ventral View, Female
Figure 1.16 Urogenital: Ventral View, Male
Figure 1.17 Urogenital: Lateral View, Male
Figure 1.18 Eye
Figure 1.19 Ear
Chapter 3: Nutrition
Table 3.2 Body Condition Score
Chapter 4: Laboratory
Figure 4.4 Cytologic Criteria of Malignancy
Figure 4.35 Relative Size of Parasite Eggs
Chapter 5: Imaging
Table 5.4 Scale of Contrast Evaluation
Table 5.7 Directional terms
Chapter 8: Patient Care
Figure 8.1 Normal Canine Electrocardiogram
Figure 8.2 Atrial Premature Contraction/Complex
Figure 8.3 ST-Segment Elevation
Figure 8.4 Ventricular Premature Contraction/Complex
Chapter 10: Wound Care
Box 10.3 Basic Bandage
Box 10.4 Robert Jones Bandage
Box 10.5 Chest/Abdominal Bandage
Box 10.6 Distal Limb Splint
Box 10.7 Casts
Box 10.8 Ehmer Sling
Box 10.9 90–90 Flexion
Box 10.10 Velpeau Sling
Box 10.11 Hobbles
Chapter 13: Anesthesia
Figure 13.1 Endotracheal Intubation
Chapter 14: Dentistry
Figure 14.1 Dentition: Canine and Feline
Figure 14.2 Cross Section of a Triple-Rooted Tooth
Figure 14.3 Skeletal Structure: Canine and Feline
Figure 14.4 Cross Section of Facial Structures: Canine and Feline
Figure 14.5 Hand-held Nonmechanical Dental Instruments
Figure 14.6 Sample of a Patient’s Dental Health Chart
Table 14.10 Radiographic Positioning
Color Plate
Anatomy
Figure 1.6 Internal Organs: Left Lateral View
Figure 1.7 Internal Organs: Right Lateral View
Figure 1.8 Internal Organs: Ventral View
Figure 1.9 Circulatory: Dorsal View of Heart
Figure 1.10 Circulatory: Internal View of Heart
Figure 1.12 Circulatory: Lateral View
Figure 1.14 Nervous System: Lateral View
Bone Marrow
Figure 4.1 Canine Bone Marrow
Figure 4.2 Canine Bone Marrow
Figure 4.3 Maturation Stages of Megakaryocytes
Tumor Cytology
Figure 4.5 Histiocytoma
Figure 4.6 Lymphoma
Figure 4.7 Mast Cell Tumor
Fecal Cytology
Figure 4.8 Clostridium
Figure 4.9 Giardia
Figure 4.10 Campylobacter
Figure 4.11 Spirochetes
Figure 4.12 Yeast
Hematology
Figure 4.13 Canine Blood Smear
Figure 4.14 Canine Distemper
Figure 4.15 Feline Blood Smear
Figure 4.16 Canine Blood Smear
Figure 4.17 Feline Blood Smear
Figure 4.18 Feline Blood Smear
Figure 4.19 Canine Blood Smear
Figure 4.20 Canine Blood Smear
Figure 4.21 Babesia canis
Figure 4.22 Cytauxoon felis
Figure 4.23 Neutrophils
Figure 4.24 Lymphocytes
Figure 4.25 Monocytes
Figure 4.26 Canine Blood Smear
Figure 4.27 Eosinophils
Figure 4.28 Basophils
Figure 4.29 Canine Blood Smear
Figure 4.30 Feline Blood Smear
Figure 4.31 Canine Blood Smear
Figure 4.32 Canine Blood Smear
Figure 4.33 Blood Smear
Ear Cytology
Figure 4.34 Malessezia
Endoparasites
Figure 4.36 Ancylostoma caninum
Figure 4.37 Ancylostoma tubaeforme
Figure 4.38 Crytosporidium
Figure 4.39 Didylidium caninum
Figure 4.40 Dirofilaria immitis
Figure 4.41 Echinococcus granulosus
Figure 4.42 Giardia
Figure 4.43 Isospora spp.
Figure 4.44 Taenia spp.
Figure 4.45 Toxocara canis
Figure 4.46 Toxocara cati
Figure 4.47 Toxoplasma gondii
Figure 4.48 Trichuris vulpis
Figure 4.49 Uncinaria stenocephala
Ectoparasites
Figure 4.50 Cheyletiella
Figure 4.51 Ctenocephalides canis
Figure 4.52 Demodex canis
Figure 4.53 Dermacentor variabilis
Figure 4.54 Linognathus setosus
Figure 4.55 Otodectes cynotis
Figure 4.56 Rhipicehpalus sanguineus
Figure 4.57 Sarcoptes scabiei canis
Figure 4.58 Trichodectes canis
Urinalysis
Figure 4.59 Bacteria
Figure 4.60 Bacteria
Figure 4.61 Bacteria
Figure 4.62 White Blood Cells
Figure 4.63 White Blood Cells
Figure 4.64 Epithelial Cells
Figure 4.65 Epithelial Cast
Figure 4.66 Fatty Cast
Figure 4.67 Granular Cast
Figure 4.68 Hyaline Cast
Figure 4.69 Red Blood Cell Cast
Figure 4.70 White Blood Cell Cast
Figure 4.71 Waxy Cast
Figure 4.72 Amorphous Phosphate Crystals
Figure 4.73 Amorphous Urate Crystals
Figure 4.74 Amorphous Biurate Crystals
Figure 4.75 Bilirubin Crystals
Figure 4.76 Calcium Carbonate Crystals
Figure 4.77 Calcium Oxalate Dihydrate Crystals
Figure 4.78 Cystine Crystals
Figure 4.79 Leucine Crystals
Figure 4.80 Sulfonamide Crystals
Figure 4.81 Triple Phosphate Crystals
Figure 4.82 Tyrosine Crystals
Figure 4.83 Uric Acid Crystals
Figure 4.84 Renal Epithelial Cells
Figure 4.85 Squamous Epithelial Cells
Figure 4.86 Transitional Epithelial Cells
Figure 4.87 Epithelial Cells and Lipid Droplets
Figure 4.88 Capillaria plica
Figure 4.89 Starch Granules
Figure 4.90 Yeast
Pain Scales
Figure 9.1 CSU Canine Acute Pain Scale
Figure 9.2 CSU Feline Acute Pain Scale
Preface
This second edition of Veterinary Technician’s Daily Reference Guide: Canine and Feline continues from the success of the first edition. As our profession continues to grow and demand more of veterinary technicians, this reference guide has done the same. With the obvious inclusion of updated medical information, this second edition contains an expansive amount of more in-depth skill descriptions allowing the technician to reach an even higher level of care. Its purpose is not to present ideas for the first time but rather to refresh or expand the veterinary technician’s current knowledge. This manual provides the link between the formal learning environment and the daily clinical setting. The goals are to increase confidence and technical skill and to allow veterinary technicians to provide clear client education.
This book covers all areas of the veterinary technology profession pertinent to canines and felines, from the basics of physical examinations to advanced skills of chemotherapy administration. We are confident that the veterinary technician will find a daily need for this invaluable resource. In the end, it is our goal that this book will facilitate improved care for patients and the owners who rely on experienced veterinary technicians.
SUMMARY OF KEY FEATURES
Comprehensive Guide. This book was written as a quick reference guide. Its purpose is to assist an already trained and licensed veterinary technician throughout the work day—providing a refresher for a seldom-taken radiograph, for example, or a pharmacology reminder to help answer a client’s question. The veterinary technology student will also find this book useful as a supplement to more in-depth textbooks as they finish training and join the workforce.
Unique Chart and Table Format. The format of this book uses charts and tables for the efficient retrieval of pertinent information. As a result, very little prose text has been included. This unique format leads technicians straight to the answers they need to perform a task quickly.
Extensive Art Program. The art program, which includes more than 200 illustrations and photographs, will provide visual assistance to the technician performing laboratory tests, dentistry, client education, and much more. The color insert makes the artwork very clear and easy to use.
Expansive Indexing. A comprehensive table of contents and references at the beginning and throughout each chapter will ease the movement through this information-rich text.
It is our expectation that this book will be of great assistance to the veterinary technician. Use of this book should result in enhanced performance of a veterinary technician’s duties and, therefore, improved care for patients.
Candyce Jack, LVT
Patricia Watson, LVT
Acknowledgments
We would like to express our heartfelt thanks to all the people who gave support and guidance during the forming of this book. We also appreciate the professional courtesy extended by Phoenix Laboratory, DentaLabels, Wiley-Blackwell, American Society of Anesthesiologists, Dr. Peter Hellyer, Dr. Narda Robinson, Tara Raske, International Veterinary Association of Pain Management, Greg deBoer, Anne Rains, Dr. David Stansfield, Novartis, Dr. James H. Meinkoth, Oklahoma State University, Gary Averbeck, Dr. Robert K. Ridley, Kansas State University, and Dr. Jay R Georgi, Dr. Daniel Chan, and Mikki Cook, LVT, Hill’s Pet Nutrition, Animal Emergency and Trauma Center.
Contributors
Dina Andrews, DVM, PhD, Dip. ACVP
Lisa Coyne, LVT
Cindy Elston, DVM
J. Michael Harter, DVM
Joyce Knoll, VMD, PhD, Dip. ACVP
Brita Kraabel, DVM
Bob Kramer, DVM, Dip. ACVR
Veronica Martin, LVT
Linda Merrill, LVT, VTS (Small Animal Internal Medicine)
Kathryn Michel, DVM, MS, Dip. ACVN
Jeb Mortimer, DVM
Richard Panzer, DVM, MS
Patrick Richardson, DVM
Nancy Shaffran, CVT, VTS (ECC)
Stuart Spencer, DVM
Cheryl Stockman, MT (ASCP)
Laura Tautz-Hair, LVT, VTS (ECC)
Sandy Willis, DVM, MVSc, Dip. ACVIM
Section One
Anatomy
Chapter 1
Anatomy
Anatomy
Figure 1.1. Overall
Figure 1.2. Regional Lymph Nodes
Musculature
Figure 1.3. Musculature: Lateral View
Skeletal
Figure 1.4. Skeletal: Lateral View
Figure 1.5. Skeletal: Dorsal View
Internal Organs
Figure 1.6. Internal Organs: Left Lateral View
Figure 1.7. Internal Organs: Right Lateral View
Figure 1.8. Internal Organs: Ventral View
Circulatory System
Figure 1.9. Circulatory: Dorsal View of Heart
Figure 1.10. Circulatory: Internal View of Heart
Figure 1.11. Circulatory: Heart Valves
Figure 1.12. Circulatory: Lateral View
Nervous System
Figure 1.13. Nervous System: Lateral View of Brain
Figure 1.14. Nervous System: Lateral View
Urogenital
Figure 1.15. Urogenital: Ventral View, Female
Figure 1.16. Urogenital: Ventral View, Male
Figure 1.17. Urogenital: Lateral View, Male
Eye
Figure 1.18. Eye
Ear
Figure 1.19. Ear
ANATOMY
For a veterinary technician to be able to accurately complete many of his or her daily tasks, a clear understanding of the anatomy of the canine and feline body is needed. The following diagrams show the basic layout of the body systems, highlighting the areas of interest that are most commonly accessed in daily medicine practices ranging from the correctly positioned radiograph to a single-stick venipuncture.
Overall
See Skill Box 2.6 Regional Lymph Node Examination, page 34.
Figure 1.1 Overall.
Figure 1.2 Regional lymph nodes.
Musculature
Figure 1.3 Musculature: lateral view.
Skeletal
See Skill Box 2.8 Orthopedic Examination, page 36.
Figure 1.4 Skeletal: lateral view.
Figure 1.5 Skeletal: dorsal view.
Internal Organs
See Skill Box 2.4 Abdominal Examination, page 33.
See Color Plates 1.6–1.8. CP-1.
Figure 1.6 Internal organs: left lateral view.
Figure 1.7 Internal organs: right lateral view.
Figure 1.8 Internal organs: ventral view.
Circulatory System
See Skill Box 2.2 Cardiac Examination, page 30.
See Color Plates 1.9, 1.10, and 1.12. CP-1, 2.
Figure 1.9 Circulatory: dorsal view of heart.
Figure 1.10 Circulatory: internal view of heart.
Figure 1.11 Circulatory: heart valves.
Figure 1.12 Circulatory: lateral view.
Nervous System
See Color Plate 1.14. CP-2.
Figure 1.13 Nervous system: lateral view of brain.
Figure 1.14 Nervous system: lateral view.
Urogenital
See Skill Box 2.4 Abdominal Examination, page 33.
See Skill Box 12.10 Urinary Catheterization, page 435.
Figure 1.15 Urogenital: ventral view, female.
Figure 1.16 Urogenital: ventral view, male.
Figure 1.17 Urogenital: lateral view, male.
Eye
Figure 1.18 Eye.
Ear
See Skill Box 2.5 Otoscopic Examination, page 33.
See Skill Box 2.13 Ear Cleaning and Flushing, page 55.
Figure 1.19 Ear.
Section Two
Preventative Care
Chapter 2: Preventative Care and Vaccinations
Chapter 3: Nutrition
Chapter 2
Preventative Care and Vaccinations
Physical Examinations
Preliminary Examination
Physical Examination
Pediatric Physical Examination
Normal Parturition
Care and Feeding of Orphaned Puppies and Kittens
Geriatric Physical Examination
Cardiac Examination
Pulmonary Examination
Abdominal Examination
Otoscopic Examination
Regional Lymph Node Examination
Neurologic Examination
Orthopedic Examination
Vaccinations
Guidelines to Follow When Vaccinating an Animal
Canine Transmissible Diseases
Coronavirus, Distemper
Hepatitis, Infectious Tracheobronchitis
Leptospirosis, Lyme Disease
Parvovirus, Rabies
Canine Vaccination Protocol
Feline Transmissible Diseases
Feline Calicivirus
Feline Infectious Peritonitis
Feline Panleukopenia Virus, Feline Immunodeficiency Virus
Feline Leukemia Virus, Feline Rhinotracheitis Virus
Feline Vaccination Protocol
Animal Care
Client Education: Home Dental Care
Grooming
Bathing
Nail Trimming
Anal Sac Expression
Ear Cleaning and Flushing
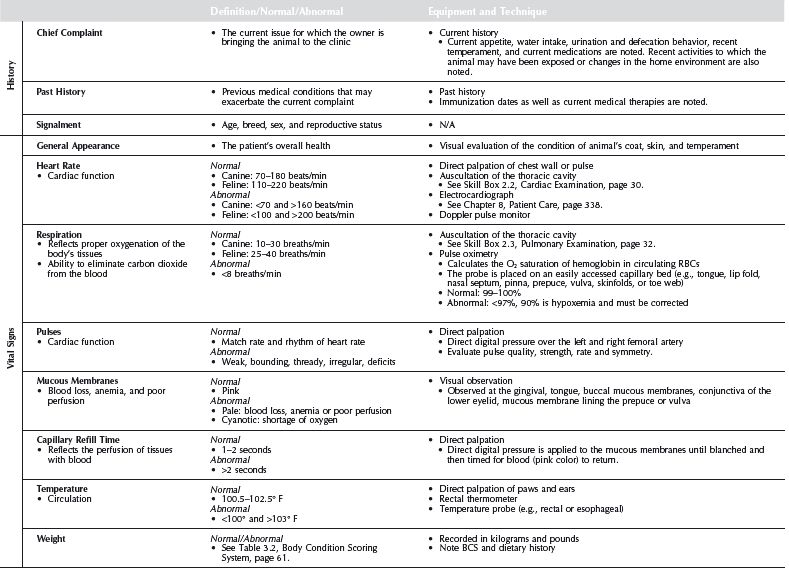
PHYSICAL EXAMINATIONS
A well-done physical examination gives the clinician invaluable information in the assessment of an animal’s health. Technicians can assist the veterinarian by understanding the pertinence of each part of the examination and by being able to conduct an examination in an orderly, precise, and timely fashion. Physical examinations are conducted prior to immunizing, before an anesthetic procedure, and in conjunction with any visit to the veterinarian for a specific problem. The following charts will cover methods and specific areas of the physical examination in both pediatric and adult patients.
Table 2.1 / Preliminary Examination
Table 2.2 / Physical Examination
Table 2.3 / Pediatric Physical Examination
This chart is designed to show the specific areas to note on puppies and kittens. A full examination should be conducted following Table 3.3, General Physical Examination.
Table 2.4 / Normal Parturition
In late term pregnancy (58–63 days), the bitch or queen should be observed for signs of labor. These may include a rectal temperature drop to <100° F, vulvar discharge, and leaking milk.
Once labor starts, the female should be left alone but observed occasionally progression and/or signs of complications.
Skill Box 2.1 / Care and Feeding of Orphaned Puppies and Kittens
Housing
- Use a box with tall sides to avoid escape, such as a cardboard pet carrier.
- Line the bottom of the box with towels and place a diaper or pee pad on top for easy cleaning.
- The box will need to be cleaned frequently to keep the neonates clean and dry.
Temperature
- Neonates are unable to maintain their own body heat; they rely on the ambient temperature and littermates.
- The environment should be draft free with a ambient temperature gradient measured by a thermometer.
- Electric heating pads and heat lamps should not be used due to the risk of overheating and burns.
- The ambient temperature should be 85–90° F for the first week, 80° F for weeks 2–4, and 70° F for week 5.
Diet
- Commercial replacement diets (e.g., Esbilac, KMR) are the best choice for diet replacement.
- When commercial diets are not available, the following recipe can be used in the interim.
- ½ cup whole milk, ½ cup water, 1 tsp. salad oil, 1 drop multivitamins, 2 egg yolks, 2 Tums (antacid) crushed
- Blend all ingredients in a blender, keep refrigerated, and use within 48 hours.
- The above diet provides 1.2 kcal/mL, which is the same as commercial diets.
- Neonates are fed 22–26 kcal/100 g body weight for the first 12 weeks of life. The diet should be gradually increased over 2–3 days to the recommended daily amount to avoid overfeeding and diarrhea.
Feeding
- The neonate will cry when hungry, but feeding should initially be expected every 2–3 hours.
- Warm the formula to a comfortable temperature, place the neonate in a comfortable dorsal position, and hold the bottle up in a position to closely mimic that of the mother. Ensure that the nipple does not contain air and the bottle is tipped up to avoid air ingestion. Neonates have a vigorous suckling response and can overfeed if not monitored. Milk bubbling out of the neonate’s nose may indicate overzealous feeding or a hole in the nipple that is too large. A satisfied neonate is quiet with a slightly enlarged abdomen. Following each feeding, burping may be necessary to expel excess air ingested.
- A nipple bottle is most commonly used, but a feeding tube can be ideal in skilled hands for weak or premature neonates See Skill Box 11.3 Nasoesophageal/Nasogastric Tube, page 415.
- With all methods of feeding, care should be taken to avoid aspiration pneumonia, a complication seen with forced nursing, squeezing the bottle, improper feeding tube use, and volume overload.
Health
- Hydration should be monitored in the neonate by mucus membranes, eyes, urine specific gravity, and urine color.
- A neonate should gain 10% of its birth weight daily.
- Crying for >15 minutes is a sign of distress (e.g., hunger, cold, neglected, pain).
Urination and Defecation
- For the first 3 weeks, the neonate must be stimulated to urinate and defecate after each feeding.
- With the neonate held securely in 1 hand (possibly with a towel) over a sink, gently massaging the lower abdomen in a circular motion. The genitals may also be rubbed with a warm, moist cotton ball.
- The genitals should be cleaned and dried to avoid skin irritation.
- Urine and feces should be seen at almost every feeding and in the box.
- Feces should be soft, but not green or yellow watery. Overfeeding is the most common cause of diarrhea; further dilute the formula by ⅓ for 2 days.
Table 2.5 / Geriatric Physical Examination
This chart is designed to show the specific areas to note on geriatric animals. A full examination should be conducted, following Skill Box 2.2, General Physical Examination. However, geriatric animals go through additional changes as a result of the natural aging process and a physical is recommended every 6 months. Many of these changes cannot be visualized on a physical examination, but they may be inferred through the general examination and from discussion with the owner. These symptoms may contribute to or initiate more serious medical conditions, thereby making their determination valuable to the clinician.
Skill Box 2.2 / Cardiac Examination
Cardiac Examination
Technique
Perform auscultation in a quiet room with a calm patient. Place the patient in a standing or sitting position. Avoid listening to recumbent animals, as the change in heart position and configuration leads to errors. The flat diaphragm is used to detect high-frequency sounds (e.g., normal heart and breath sounds, most murmurs), while the bell is used to detect lower-frequency sounds (e.g., 3rd and 4th heart sounds, diastolic murmurs). The entire heart is examined, paying particular attention to the cardiac valves. Begin by placing the diaphragm gently but firmly at the left apex, where the first heart sound is best heard and also the location of the mitral valve. From here, inch the stethoscope to the left base of the heart, which is approximately 2 rib spaces cranial and slightly dorsal. Note the second heart sound and possible aortic and pulmonic stenosis murmurs. Next, palpate the right apex of the heart and move the stethoscope to this region. This is the tricuspid region and possible location of tricuspid regurgitation. Then move to the right base of the heart and observe for subaortic stenosis. Once an abnormality is noted, the surrounding region should be evaluated to find the point of loudest sound. In this process, the entire heart region should be evaluated and a complete examination given.
Rate
- Canine: 70–180 beats/min
- Feline: 110–220 beats/min
Skill Box 2.3 / Pulmonary Examination
Pulmonary Examination
Technique
- Begin the examination by observing the respiratory effort (quality) and pattern and any signs of respiratory distress (e.g., nostril flare, intercostal rib retraction). After the initial assessment, perform auscultation in a quiet room with a calm patient. Place the patient in a standing or sitting position. Avoid listening to recumbent patients as it leads to errors due to changes in thoracic conformation. Divide the thoracic cavity into quadrants to follow a sequential pattern. As each quadrant is auscultated, it is observed for respiratory rate and breath sounds.
Rate
- Canine: 10–30 breaths/min
- Feline: 25–40 breaths/min
Breath Sounds
- Should be heard equally on both sides of the thorax. Breath sounds heard outside the location defined below can be indicative of a medical problem. The normal respirations of canines can be heard throughout inspiration and during the first ⅓ of expiration. Only during inspiration can normal lung sounds be heard in a cat.
Normal
- Bronchial:
- Location: center of the chest cavity over caudal trachea and larger bronchi
- Sound: intense and harsh sounds, full inspiratory and expiratory phase with a louder inspiratory phase
- Bronchovesicular:
- Location: surrounding the bronchial region
- Sound: intermediate sounds representing a combination of bronchial and vesicular sounds, full inspiratory phase with a short and quieter expiratory phase.
- Vesicular:
- Location: periphery of thoracic cavity
- Sound: softer sound (e.g., wispy, rustling of leaves), inspiratory phase is slightly longer and louder than expiratory phase.
Abnormal
- Stertor:
- Location: larynx or trachea
- Sound: discontinuous low-pitched snoring sound heard mainly on inspiration
- Cause: tissue or secretions transiently obstruct airflow (e.g., elongated soft palate)
- Stridor:
- Location: larynx or thoracic inlet, referred sounds maybe heard throughout the thorax
- Sound: intense continuous high pitched wheezes heard on inspiration
- Cause: upper airway obstruction
- Crackles (rales):
- Location: over chest
- Sound: discontinuous popping sound heard mainly on inspiration; defined as fine, medium, or coarse
- Cause: fluid or exudate accumulation within airways or inflammation and edema in pulmonary tissue
- Rhonchi or wheezes:
- Location: isolated or variable
- Sound: continuous musical sounds, low or high pitched heard at the end of inspiration or beginning of expiration; defined as high pitched or low pitched
- Cause: ↓ airway lumen diameter
|
Skill Box 2.4 / Abdominal Examination
Abdominal Examination
Technique
- Gentleness when palpating an animal is essential as internal structures may be damaged if handled roughly. Structure descriptions can be: doughy (soft tissue that can be impressed with fingertips), firm (normal organ), hard (bones), fluctuant (soft, elastic, and undulates under pressure). Abnormalities noted on palpation are the following: pain, abnormal structures and their size, consistency, and shape, and location.
- Large canine
- Place the patient in a standing position. Stand on either side or to the rear. Place 1 hand on either side of the abdomen in a flat and relaxed position. Begin at the spine and gently and slowly move ventrally, allowing the abdominal viscera to slip through the fingers. Repeat this process throughout the abdomen moving caudal.
- Small canine or feline
- Place the patient in a standing position. Stand next to the patient. Cup 1 hand around the abdomen with the thumb on 1 side and the fingers on the other side in a flat and relaxed position. Begin at the spine and gently and slowly move ventrally, allowing the abdominal viscera to slip through the fingers. Repeat this process throughout the abdomen moving caudal.
- Internal structure location
- Cranial abdomen
- Palpation of the liver, spleen, and the small intestines
- Liver is difficult to palpate and extension past the costal arch may indicate hepatomegaly.
- Spleen is difficult to palpate and recognition may indicate splenomegaly.
- Normal stomach is rarely palpable, but with overeating (doughy or fluid-filled) or gastric distention it may be felt.
- Mid-abdomen
- Palpation of the small intestines, kidneys, and spleen
- Right kidney is more cranial than the left kidney in cats and may be obscured by the ribs.
- Mesenteric lymph nodes are difficult to palpate unless enlarged.
- Caudal abdomen
- Palpation of the colon, uterus, bladder, prostate, and small intestine
- Feces can be discerned from a mass by its deformability with fingertip imprints.
- Prostate can occasionally be palpated central to the colon and caudal to the bladder.
Skill Box 2.5 / Otoscopic Examination
Otoscopic Examination
Technique
- Examine the good ear first to avoid spread of infection and to decrease resistance to examination of the possibly more painful ear. Begin with an otoscope with the appropriate sized cone for the patient. For ease of examination, the patient should be placed on a table or large canines should be placed in a sitting position. The head should be held in such a manner to avoid crushing the ear canal while directing the muzzle toward the thoracic inlet. Holding the pinna up and out from the base of the skull will allow straightening of the ear canal. Gently insert the otoscope into the external ear canal and slowly advance while observing the canal. As the cone enters the vertical canal, the pinna is pulled up and over the otoscope while the otoscope handle is rotated to a horizontal position. The tympanic membrane will then be visualized in a normal ear as a white translucent membrane. Any abnormalities such as: inflammation, redness, exudate, foreign objects, mites, or tumors should be noted.
Skill Box 2.6 / Regional Lymph Node Examination
Regional Lymph Node Examination
Technique
- Three pairs of lymph nodes are routinely palpated in a normal animal; submandibular, prescapular, and popliteal. Axillary and inguinal nodes can often only be palpated with enlargement. Peripheral lymph nodes should be palpated simultaneously to evaluate symmetry. Enlarged nodes may be an initial indicator of a problem. Lymph nodes are generally smooth and oval in shape and can be most easily felt by grabbing the skin and allowing it to slip through the fingertips while pulling the hands away.
- Submandibular
- Location: ventral to the angle of the mandible, cranial to the parotid and submaxillary salivary glands
- Size: group of 2 or 3 nodes pea to grape size
- Prescapular (superficial cervical)
- Location: in front of the cranial border of the scapula
- Size: group of 2 or 3 nodes slightly larger than submandibular nodes
- Popliteal
- Location: caudal to the stifle
- Size: 1 node about the size of a pea; not always palpable in smaller animals
- Axillary
- Location: caudal and medial to the shoulder joint
- Size: 1 or 2 nodes; not palpable in normal animals (0.5-10 mm)
- Inguinal
- Location: furrow between the abdominal wall and the medial thigh
- Size: 2 nodes, not palpable in normal animals (0.5-10 mm)
Skill Box 2.7 / Neurologic Examination
Neurologic Examination
- Technique
- The neurologic examination begins as the patient walks into the examination room. Notice should be paid to the patient’s body posture (e.g., head tilt), attitude (e.g., demented, semicomatose, disoriented) and gait (e.g., inability or abnormal walk, dragging limbs, circling), purposeful movement (e.g., attempt to move down limbs), and palpation (e.g., symmetry, worn toenails, ↑ or ↓ muscle tone, masses).
Postural Reactions
- The patient’s ability to recognize an abnormal position and change its position to bear weight and be able to walk. All levels of the nervous system are evaluated, but lesion localization is not possible.
- Extensor postural thrust
- While supporting the patient under the thorax, as the hindlimbs touch the floor, monitor for symmetric caudal walking motions.
- Hemistanding/hemiwalking
- A hindlimb and front limb of the same side are lifted, monitor for lateral walking movements.
Spinal Reflexes
- Deficits in spinal reflexes alert to a problem along the nerve pathway; receptor, sensory nerve, efferent nerve, and skeletal muscles. Responses seen may be normal, absent, depressed or exaggerated.
- Anal sphincter reflex
- Perineal stimulation with a needle or forceps; monitor for contraction of the anal sphincter muscle.
- Panniculus reflex
- Pin prick stimulus to skin over the back; monitor for twitching of cutaneous trunci muscles on both sides.
- Hopping
- While supporting the patient, 3 limbs are lifted and the patient is moved medially and laterally, monitor for initiation and movement of hopping.
- Placing
- While supporting the patient under the thorax, the thoracic limbs are brought in contact with the edge of a table; immediate placement of the limbs on top of the table is expected.
- This is done twice, once with the eyes covered and once with the eyes opened.
- Proprioceptive positioning
- While supporting the patient, turn the hind foot over onto the dorsal surface and monitor the length of time to turn it back to a normal position, if even able.
- Wheelbarrowing
- While supporting the patient under the abdomen with the hindlimbs lifted, monitor the length of time to start walking forward and the walking coordination.
Hindlimb Reflexes
- Cranial tibial response
- Percuss muscle belly; monitor for flexion of the hock.
- Crossed extensor reflex
- Pinch digits of down limb; monitor for involuntary movement of upper limb.
- Gastrocnemius reflex
- Percuss Achilles tendon; monitor for extension of the hock.
- Patellar reflex
- Patient in lateral recumbency and stifle gently supported in a flexed position, percuss patellar tendon; monitor for extension of the stifle.
- Sciatic response
- Percuss thumb in the sciatic notch; monitor for jerk of the entire limb.
- Withdrawal
- Patient in lateral recumbency. pinch digits; monitor for flexion of the limb and pain recognition.
Front Limb Reflexes
- Extensor carpi radialis response
- Percuss the extensor carpi radialis muscle; monitor for extension of the carpus.
- Triceps reflex
- Patient in lateral recumbency with limb supported, elbow fully extended and leg caudal, percuss the triceps tendon: monitor for slight extension of the elbow.
- Withdrawal
- Patient in lateral recumbency, pinch digits; monitor for flexion of the limb and pain recognition.
Sensory Evaluation
- Evaluation of deep pain perception
- Hyperpathia
- Pressure is applied along the thoracic and lumbar regions to the spine and muscles at each vertebra; monitor for a behavioral response to pain
- Sensory level
- Pin prick stimulus to skin over the back, monitor for behavioral response
Cranial Nerves
- The following cranial nerves (CN) are evaluated with a suspected brain lesion
- Optic nerve (CN II): vision, menace response
- Oculomotor nerve (CN III): pupillary light response, size and symmetry
- Trochlear nerve (CN III, IV, VI): eye movements
- Trigeminal nerve (CN V, VII): muscle mass, jaw tone, facial movements, blinking, lip retraction
- Vestibulocochlear nerve (CN VIII): hearing
- Glossopharyngeal and vagus nerves (CN IX, X, XI): pharyngeal sensation, gag response
- Hypoglossal nerve (CN XII): tongue movement and strength
Skill Box 2.8 / Orthopedic Examination
Orthopedic Examination
Technique
- Similar to the neurologic examination, the orthopedic examination begins as the patient enters the examination room. Notice should be paid to the patient’s conformation, stance, sitting, standing, rising and gait. The examination should continue with a hands-on evaluation of the area of concern, including the alternate side. A systematic approach should be used to cover the entire limb, often beginning distally and moving proximal. Alterations in range of motion and rotation should be noted along with any crepitus, clicking, clunking, instability, swelling, muscle atrophy or overdevelopment, and pain. Begin the examination by evaluating the nonaffected joint to assess the patient’s normal response to manipulation and pressure.
Stifle
- Cranial drawer motion
- Patient in lateral recumbency, 1 hand stabilizes the femur proximal to the stifle. The second hand is placed with the thumb behind the fibular head and the index finger over the tibial crest. With the femur stabilized, the second hand moves the tibia cranial and distal in a plane parallel to the tibial plateau. Monitor for the tibia sliding cranially or caudally in relationship to the femur indicating cruciate ligament rupture or partial tear.
- Test should be performed with the stifle joint in extension, 90° flexion, and normal standing position.
- Tibial compression test
- Limb is held in a standing position, the hock is flexed to tense the gastrocnemius muscle which compresses the femur and tibia together; monitor for forward motion of the tibia in a ruptured cranial cruciate ligament.
- Patellar luxation, medial
- Limb is held extended with the foot rotated internally, digital pressure is applied medially; monitor for medial displacement indicating luxation.
- Patellar luxation, lateral
- Limb is held slightly flexed with the foot rotated externally, digital pressure is applied laterally; monitor for lateral displacement indicating luxation.
Pelvis
- Barden’s procedure
- Patient in lateral recumbency, grasp the femur with 1 hand. Place the thumb of second hand on the greater trochanter of the femur, while resting the rest of your palm on the pelvis. With gentle pressure, attempt to lift the femur, keeping it parallel to the table. Monitor for subluxation of the femur through the thumb on the greater trochanter indicating hip laxity.
- Barlow’s sign
- Patient in dorsal recumbency with stifle flexed, the left hand is placed on the right stifle and slowly adducted, monitor for luxation of the femoral head from the acetabulum indicating joint capsule stretching.
- Hip luxation
- Patient in a standing position, place the thumb in the space caudal to the greater trochanter, externally rotate the femur; monitor for the trochanter to roll over the thumb indicating luxation.
- Ortolani maneuver, lateral recumbency
- Limb is held in a standing position parallel to the table surface. One hand is placed over the hip joint, the other hand cups the stifle joint to apply pressure pushing the femoral head in a dorsal direction in relation to the acetabulum. Monitor for hip subluxation indicating hip laxity.
- Ortolani maneuver, dorsal recumbency
- Stifles are positioned parallel to each other and perpendicular to the table. Downward pressure is applied on the stifles to subluxate the hip. Maintain pressure and abduct the stifle. Monitor for hip subluxation indicating hip laxity.
VACCINATIONS
Young animals receive a small amount of natural immunity from their mother’s milk, exchanged in the form of colostrum, during the first few days of nursing. However, this temporary maternal protection wanes by 6–9 weeks. To continue and enhance this protection, vaccinations are available to protect the animal from contracting various highly contagious diseases. These diseases and their corresponding vaccinations are charted on the following pages.
Vaccines in general are meant to be stored in the refrigerator, and need to be shaken well before dispensing. Lyophilized vaccines should be used within 30 minutes of reconstitution. Heat, excessive cold, and light exposure can inactivate the vaccine and make them ineffective.
Guidelines to Follow When Vaccinating an Animal
- A complete physical examination and health evaluation are given by a veterinarian before any vaccination.
- Do not vaccinate pregnant animals with a modified live vaccine.
- Animals with a fever or in debilitated health should not be vaccinated until healthy.
As a constant effort to increase patient bonding and improve client satisfaction, special steps can be taken to ensure patient and owner comfort. Taking the extra steps to make this a more enjoyable experience will benefit both the patient and staff in future visits. A few tips for making injections a more comfortable procedure include:
- Allowing the vaccine to warm to room temperature
- Changing needles before injection; use of a 25-gauge needle
- Gently squeezing or flicking the injection site to dull the area
- Distracting the patient (e.g., treats, sliding the patient across the table or lifting their front legs, twitching a ear or tapping the nose, talking to the patient).
Adverse reactions:
As with the administration of any drug, vaccines can result in adverse reactions. Possible reactions range from sensitivity at the injection site, a small bump or knot at the injection site, slight fever, hives, lethargy, and anaphylactic shock (vomiting, salivation, dyspnea, and incoordination). Precautions should be taken in animals with a history of vaccine reactions. Vaccines should be avoided if possible, but if they must be given the following guidelines should be observed:
- A vaccine from a different manufacturer
- Premedication with diphenhydramine and prednisolone sodium succinate 30 minutes prior to the vaccination
- Hospital observation for the day
Clients should be educated to monitor vaccination sites for lump formation and contact their veterinarian if found. Biopsies should be taken following the AAFP guidelines:
- Present for 3 months
- ≥2 cm in diameter
- ↑ Size after 1 month
Titers:
The discussion of vaccine titers has become very popular in veterinary medicine, and continues to remain controversial. Titers are available from various laboratories for distemper, parvovirus, rabies, and panleukopenia. If a titer is high, it is accepted as providing protection; however a low titer result does not reflect the immunization of an animal. Titers are best used following the puppy vaccine series to ensure proper levels of immunity have been reached.
As each animal and its environment are unique, vaccine recommendations will vary accordingly at the discretion of the veterinarian and in accordance with state laws.
Table 2.6 / Canine Transmissible Diseases: Coronavirus, Distemper
Table 2.7 / Canine Transmissible Diseases: Hepatitis, Infectious Tracheobronchitis
Table 2.8 / Canine Transmissible Diseases: Leptospirosis, Lyme Disease
Table 2.9 / Canine Transmissible Diseases: Parvovirus, Rabies
Table 2.10 / Canine Vaccination Protocol
The site of vaccine injection varies between clinics, but it is important to have a designated location for each vaccine and to note these locations in each patient’s chart. Vaccines are routinely given subcutaneously, except for the intranasal version of Bordetella.
Table 2.11 / Feline Transmissible Diseases: Feline Calcivirus
Table 2.12 / Feline Transmissible Diseases: Feline Infectious Peritonitis
Table 2.13 / Feline Transmissible Diseases: Feline Panleukopenia Virus, Feline Immunodeficiency Virus
Table 2.14 / Feline Transmissible Diseases: Feline Leukemia Virus, Feline Rhinotracheitis Virus
Table 2.15 / Feline Vaccination Protocol
The site of vaccine injection varies between clinics, but it is important to have a designated location for each vaccine and to note these locations in each patient’s chart. Feline vaccines vary as to their route of administration: subcutaneously, intranasally/intraocularly, or transdermally. The Vet Jet transdermal vaccination system utilizes an internal spring system, which disperses the vaccine through the dermis into the dendritic cells.
ANIMAL CARE
Along with medical care provided by the veterinarian, owners must take an active role in the day-to-day health of their animals. Dental care, grooming, and basic medical procedures can help provide the animal with increased health and longevity. Besides providing the basic care, it also allows the owners to be more aware of other health problems that might otherwise be missed (e.g., gum inflammation, tumors, pruritus, otitis externa).
Skill Box 2.9 / Client Education: Home Dental Care
Home dental care should be a daily part of each animal’s life. The commitment to time, energy, and resources from the owner will impact the quantity and quality of their animal’s life.
Supplies:
- Toothbrush (e.g., fingerbrush, pet toothbrush, human toothbrush), gauze, washcloth, pantyhose
- Veterinary toothpaste, beef bouillon, garlic or tuna water
Age:
- Home dental care should begin at 8–12 weeks of age. Brushing is not critical until the adult teeth erupt, but starting early allows the animal to become accustomed to the procedure during an impressionable period of development.
Introduction:
- Regardless of age, introduce brushing slowly and gradually, allowing the animal to determine the amount of time at each stage.
- As each step is begun, observe for the animal’s reaction and only advance to the next step once the animal is comfortable.
- Massage the animal’s muzzle and lips gently.
- Introduce your finger dipped in beef bouillon or garlic water (canine) or tuna water (feline) into the buccal pouch under the upper lip and rub the gum line.
- Introduce your finger covered with a gauze, washcloth, or pantyhose and rub the gum line and teeth in a circular motion.
- Introduce a pet toothbrush or a very soft human toothbrush held at a 45° angle to the tooth surface, brushing in a oval motion.
- Introduce the toothbrush with veterinary toothpaste.
- As the animal accepts the procedure, brushing of the lingual surfaces can begin.
- Place the nonbrushing hand over the muzzle and tilt head backward to open the animal’s mouth.
- Brush the visible teeth (opposite side) and then repeat on the other side.
Maintenance:
- Brush daily, at a minimum of 3 times a week.
- Oral examination
- Gums: redness, swelling, bleeding, pus
- Teeth: loss, instability, broken, change in color
- Mouth: halitosis, growth
Adjuncts to brushing:
- Dental diets or treats
- Rawhide bones (e.g., Nylabone)
- Yearly dental examinations and cleanings, if needed
Tips for successful brushing:
- Select the same time each day to brush so the animal expects it (routine and repetition).
- Brushing in the evening is often preferred as everyone is in a more quiet mood.
- Sessions should be short, roughly 2-3 minutes.
- Offer praise and reassurance during and following the brushing.
Avoid:
- Human toothpaste, baking soda, or hydrogen peroxide
- Heavy restraint
- Brushing aggressively
- Brushing if the procedure may cause pain (e.g., recent thorough oral examination, existing CLL, exposed pulp cavities, gingivitis, ulcerations, tooth mobility)
- Natural bones, cow hooves, hard nylon toys as they may fracture teeth
Skill Box 2.10 / Grooming
Grooming is a segment of veterinary care that is limited and typically presents itself as client education. Even though staff may not routinely provide grooming services, clients often have questions regarding the general care of their pets. Brushing, bathing, and toenail trims are the most basic of grooming procedures. There are also certain procedures that may be performed during periods of medical conditions that must be continued routinely to avoid reoccurrence of the problem, such as anal gland expression and ear cleaning and flushing.
Brushing should be a routine part of pet care to remove dead fur and dirt and to prevent matting. Besides providing the animal with a shinier and healthier coat and a chance to look and feel for abnormalities, it also allows bonding between the animal and the owner. There are many types of brushes and combs available for specific types of coats; a variety of options can be helpful. Applying a detangler spray before beginning may help with tangled or slightly matted fur. Using a systematic approach, begin at the head and work toward the tail. Use a gentle stroke, as ripping or pulling at the fur is painful and will make brushing a negative experience. For animals with long, thick coats, brush the fur against the natural lay of the fur and then finish with brushing fur down. Following up with a comb may help remove the extra loose fur.