

The Official BBC micro:bit® User Guide
Published by
John Wiley & Sons, Inc.
10475 Crosspoint Boulevard
Indianapolis, IN 46256www.wiley.com
Copyright © 2018 by John Wiley & Sons, Inc., Indianapolis, Indiana
Published simultaneously in Canada
ISBN: 978-1-119-38673-5
ISBN: 978-1-119-41376-9 (ebk)
ISBN: 978-1-119-41384-4 (ebk)
No part of this publication may be reproduced, stored in a retrieval system or transmitted in any form or by any means, electronic, mechanical, photocopying, recording, scanning or otherwise, except as permitted under Sections 107 or 108 of the 1976 United States Copyright Act, without either the prior written permission of the Publisher, or authorization through payment of the appropriate per-copy fee to the Copyright Clearance Center, 222 Rosewood Drive, Danvers, MA 01923, (978) 750-8400, fax (978) 646-8600. Requests to the Publisher for permission should be addressed to the Permissions Department, John Wiley & Sons, Inc., 111 River Street, Hoboken, NJ 07030, (201) 748-6011, fax (201) 748-6008, or online at http://www.wiley.com/go/permissions.
Limit of Liability/Disclaimer of Warranty: The publisher and the author make no representations or warranties with respect to the accuracy or completeness of the contents of this work and specifically disclaim all warranties, including without limitation warranties of fitness for a particular purpose. No warranty may be created or extended by sales or promotional materials. The advice and strategies contained herein may not be suitable for every situation. This work is sold with the understanding that the publisher is not engaged in rendering legal, accounting, or other professional services. If professional assistance is required, the services of a competent professional person should be sought. Neither the publisher nor the author shall be liable for damages arising herefrom. The fact that an organization or Web site is referred to in this work as a citation and/or a potential source of further information does not mean that the author or the publisher endorses the information the organization or website may provide or recommendations it may make. Further, readers should be aware that Internet websites listed in this work may have changed or disappeared between when this work was written and when it is read.
For general information on our other products and services please contact our Customer Care Department within the United States at (877) 762-2974, outside the United States at (317) 572-3993 or fax (317) 572-4002.
Wiley publishes in a variety of print and electronic formats and by print-on-demand. Some material included with standard print versions of this book may not be included in e-books or in print-on-demand. If this book refers to media such as a CD or DVD that is not included in the version you purchased, you may download this material at http://booksupport.wiley.com. For more information about Wiley products, visit www.wiley.com.
Library of Congress Control Number: 2017950180
Trademarks: Wiley and the Wiley logo are trademarks or registered trademarks of John Wiley & Sons, Inc. and/or its affiliates, in the United States and other countries, and may not be used without written permission. Micro:bit is a registered trademark of the British Broadcasting Corporation. All other trademarks are the property of their respective owners. John Wiley & Sons, Inc. is not associated with any product or vendor mentioned in this book.
For my father, the enthusiastic past, and my daughters,
the exciting future.
—Gareth
GARETH HALFACREE is a freelance technology journalist and the co-author of the Raspberry Pi User Guide alongside project co-founder Eben Upton. Formerly a system administrator working in the education sector, Gareth's passion for open source projects has followed him from one career to another, and he can often be seen reviewing, documenting or even contributing to projects such as GNU/Linux, LibreOffice, Fritzing and Arduino. He is also the creator of the Sleepduino and Burnduino open hardware projects, which extend the capabilities of the Arduino electronics prototyping system. A summary of his current work can be found at http://freelance.halfacree.co.uk.
DAVID WHALE is an embedded software engineer whose career of over 30 years has involved him designing and building embedded software for a diverse collection of high tech products. David is a STEM Ambassador and volunteer for the Institution of Engineering and Technology (IET), where he regularly helps schools and teachers introduce and run computing clubs, as well as trains teachers nationally. It was through his association with the IET that David became involved with the micro:bit project, where he has helped to develop a large base of teaching resources, as well as train and support the delivery of the IET Faraday national STEM challenge days using the BBC micro:bit. David now works with the Micro:bit Educational Foundation, where he continues to develop projects and resources with many partner organisations, which includes the Doctor Who team at the BBC. David is the co-author of the successful Wiley title Adventures in Minecraft, a book that teaches Python coding to children via their interest in the Minecraft game, and he has been technical editor of a wide range of technology and computing books.
Project Editor
John Sleeva
Technical Editor
David Whale
Production Editor
Barath Kumar Rajasekaran
Copy Editor
Karen A. Gill
Production Manager
Katie Wisor
Manager of Content Development and Assembly
Mary Beth Wakefield
Marketing Manager
Christie Hilbrich
Professional Technology & Strategy Director
Barry Pruett
Business Manager
Amy Knies
Executive Editor
Jody Lefevere
Associate Acquisitions Editor
Riley Harding
Project Coordinator, Cover
Brent Savage
Proofreader
Debbye Butler
Indexer
Estalita M. Slivoskey
Cover Designer
Wiley
Cover Image
Courtesy of Gareth Halfacree
IN APRIL 2015, I spent a lunchbreak searching my local supermarket for the cheapest thing I could cannibalise to finish a demo for the BBC. What they saw that afternoon was the battery clip from a £1 alarm clock, glued onto an early BBC micro:bit prototype. I was building a demo as one of the 31 partner organisations that the BBC had recruited to help them deliver a bold and audacious project: to give a coding device to every year 7 in the UK, for free. However, the BBC micro:bit wasn’t designed to be just another programmable ‘development board’, but a seamless plug-and-play tool that puts creativity, learning, and ease-of-use for teachers and young people first.
As an engineer on the project, the most compelling thing about working with the BBC micro:bit is seeing the exciting (and sometimes ridiculous) things these new audiences choose to do with this technology: build a team game based on a teleporting duck, measure a rocket car’s acceleration, tell the interactive story of pizza, build a portable heart-rate-monitor, or invent the fantastic ‘rain detecting hat’ you can find in this book. This guide brilliantly captures the exhilaration, simplicity, and creative potential of the BBC micro:bit, and I’m sure it will help many more people become coders and inventors.
Instantly interactive, the BBC micro:bit’s sensors and slick design make it accessible and exciting to the widest possible audience, even (perhaps especially) those who didn’t realise that coding was for them. It takes no time at all to build your first program, and the simplicity of the tools means that what follows is an upward spiral of success and satisfaction that encourages your imagination to run wild.
Part of the magic of the BBC micro:bit is how effortlessly it brings the virtual and physical together. Within minutes, things you’ve made with the computer start controlling the real world. It’s this physicality and immediacy that create the ‘micro:bit moment’. It’s amazing to see people of all ages have that empowering experience when they realise the potential of the device in their hands, and want to make something new with it—the moment people start to feel excited about playing with technology instead of nervously holding back from it.
But micro:bit isn’t really about learning to code; it’s about learning to do things that you care about with technology. Learning to code happens along the way: you learn about loops almost by accident because you’re making your BBC micro:bit dance, and the song has a verse and chorus that repeat. This approach helps engage new coders of all ages. Independent research tracked the progress of the BBC micro:bit in the UK during its first year and found that 85% of teachers who used the device agreed that it made Computer Science more enjoyable for their students, and 90% of the children who used it said it helped show them that anyone can code.
The cool design, broad appeal, and technological simplicity of the micro:bit tools come as a direct result of the diverse backgrounds, outlooks, communities, and interests within the micro:bit partnership. This broad, interdisciplinary team has shaped the device, the editors, the learning materials, and the concept of the micro:bit itself into a truly unique ecosystem.
Founded in September 2016, the Micro:bit Educational Foundation has been entrusted with supporting and developing that ecosystem, and taking the micro:bit project around the world. At the time of writing, the device is available in more than 50 countries, with the website available in 12 languages. We have a growing library of lesson plans, projects and ideas, new, more advanced editors developed with our partners (which are explained in this book), and a growing community of enthusiasts, volunteers, great partners, and educators.
So, getting started with the BBC micro:bit isn’t just about building your own creations. It’s also about joining a worldwide community of people who are using technology creatively to express themselves, solve problems they care about, make life better for others, and help change the way it feels to learn to code.
This book will introduce you to the world of micro:bit, but it’s only the start of your journey. Welcome to the micro:bit community. We’re looking forward to seeing what you create!
—Jonny Austin, CTO, Micro:bit Educational Foundation
EDUCATIONAL COMPUTING HAS a long and storied history, beginning with the adoption of mechanical calculators to aid with mathematics classes through to the early days of microcomputing with initiatives like the BBC Computer Literacy Project in the 1980s. As the cost of computers came down and their capabilities increased, schools around the world rapidly went from a single shared computer to entire rooms filled with computers, integrating them into lessons from languages and history to engineering and art.
Today many homes have a computer of their own, or in some cases more than one. While access to computers has increased, actually operating them brings with it a sense of being disconnected from their inner workings. The BBC Micro, the 1980s microcomputer designed by Acorn Computers and at the heart of the BBC Computer Literacy Project, loaded straight into a text-based programming language known as the Beginner’s All-Purpose Symbolic Instruction Code (BASIC) and invited experimentation; today, the majority of computers load into a graphical user interface (GUI) which emphasises the use of pre-written programs over creating your own.
The BBC micro:bit is designed to bring back the days of learning to write your own code on a low-cost, easily-understood platform. Designed to sit at the heart of an international computer literacy programme directly inspired by the BBC’s original Computer Literacy Project, the BBC micro:bit is an affordable microcontroller on which you can run your own programs to do everything from spell out your name or play a game to turn lights on and off or communicate via radio.
Schools around the world have begun to adopt the BBC micro:bit in their curricula, but it’s by no means exclusively for structured educational use. The device’s readily accessible nature means it can be used to teach programming and computing concepts to children of any age, its robustness and small size mean it’s extremely portable and well-suited to wearable projects, and its surprising power and flexibility mean that you’re unlikely to find yourself restricted by its capabilities even when using it at the heart of more complex projects.
This book is written for anyone interested in working with the BBC micro:bit. You don’t need pre-existing knowledge of computers, electronics, or programming to be able to pick up a BBC micro:bit and get started.
All you need to get the most from this book is the ability to read and a willingness to learn. If you’ve used computers before, you’ll find that you are able to skim through some of the early chapters on general concepts. If you’ve used other microcontroller-based development boards, you can skip still more. If you’ve written your own computer programs, then you’ll find programming for the BBC micro:bit immediately familiar. And if you know your way around an electrical circuit, the later chapters should hold few surprises.
Whether you’re an existing user of the BBC micro:bit or a complete newcomer, this book aims to get you started on your journey with a minimum of fuss and maximum enjoyment.
The march of technology is constant, and the BBC micro:bit is no exception. This book has been written based on the most recent version of the BBC micro:bit hardware, revision 1.3b, but it is entirely applicable to all versions going back to the first prototype versions given to schools for testing purposes. Equally, it will remain applicable to all future revisions thanks to the sterling work of the Micro:bit Educational Foundation, which has been instrumental in the development of this book.
The software for the BBC micro:bit is, as with the hardware, under constant development. References to the software in this book are accurate at the time of writing, and all screenshots and related materials have been captured on the very latest software versions. Over time, small changes may be made to the way the software looks, but the way it works will remain the same.
This is especially important for the programs contained within the book. Although the languages available for the BBC micro:bit will expand over time and gain additional features, the existing features will always be available. A program taken from this book today will still be usable with the BBC micro:bit years down the line.
Part I, ‘An Introduction to the BBC micro:bit’, offers a guide to the hardware and how it works, step-by-step instructions on unpacking your first BBC micro:bit and exploring its sample program, and connecting the BBC micro:bit to your computer so you can load a program of your own. This section also contains a number of tips on working with the BBC micro:bit, including how to handle it to protect it against possible damage. Even if you’ve already worked with a BBC micro:bit, reading this section is well advised.
Part II, ‘Coding for the BBC micro:bit’, gets you started writing your own programs. You learn the languages available for the BBC micro:bit and how they differ, and you learn to write your own programs from a simple message scrolling across the BBC micro:bit’s display and reading from its various built-in sensors to writing a simple game.
There’s a chapter dedicated to each of the three main programming languages used with the BBC micro:bit: JavaScript Blocks, JavaScript, and Python. Each chapter is designed to be as close to identical to the others as possible, allowing you to quickly see how the process of writing each program differs between languages. You can use the comparison table at the start of the section to pick a favoured language and read only that language’s chapter, or you can work through all three chapters in turn to get a real feel for how each operates.
Part III, ‘Advanced BBC micro:bit Projects’, goes a step further, introducing the radio module with examples on communicating between individual BBC micro:bits and groups of BBC micro:bits without the need for wires. There’s also a chapter dedicated to using the BBC micro:bit with the popular Raspberry Pi educational single-board computer, extending the capabilities of both devices.
In addition, you learn how to add external components like switches and LEDs to the BBC micro:bit, building electronic circuits from basic components to further extend its functionality. There’s no soldering involved, and the circuits described are designed to be safe and accessible for even the youngest reader; they require only a small number of affordable electronic components.
You will now have a sound understanding of how the BBC micro:bit works, how to program it, and how to use it with other devices. You still won’t have reached the end of its capabilities, though, so the final chapter offers information on additional resources, including add-on hardware which can further increase the BBC micro:bit’s flexibility, and websites offering more project ideas and formal lesson plans for use in structured education.
Finally, the appendices have full program listings for every program mentioned in the book in all three languages, making it easy to type them in without getting distracted by comments and explanations of what each part of the program is doing. If you’d rather save your fingers, you can download the same program files from the book’s website at www.wiley.com/go/bbcmicrobituserguide. You’ll also find a pin-out diagram of the BBC micro:bit with a full list of its capabilities.
Technically speaking, you can begin using this book even without a BBC micro:bit of your own; simulators allow you to write programs designed for the BBC micro:bit and see how they run even without loading them onto a physical BBC micro:bit. You’ll get the most from the book if you have at least one BBC micro:bit with which to experiment, however, along with a few extras detailed here.
To run the main program samples listed in this book, you need the following:
For the radio programs included in Chapter 8, ‘The Wireless micro:bit’, you also need:
To run the programs listed in Chapter 9, ‘The BBC micro:bit and the Raspberry Pi’, you need:
To build the circuits detailed in Chapter 10, ‘Building Circuits’, you also need the following:
These parts are readily available via the Internet or in high-street electronics component shops, and they can frequently be supplied by BBC micro:bit resellers alongside the BBC micro:bit itself.
To help you get the most from the text and keep track of what's happening, we've used a number of conventions throughout the book.
Technical terms are presented in italic when they’re first used. The same applies to acronyms and initialisms, which are presented in full when first used and then in their abbreviated form.
Metric measurements are used throughout this book, with imperial measurements provided in brackets where appropriate.
When a line of code would extend past the border of the page, a ↩ symbol is printed. When you see this symbol, continue to type the code without pressing the Enter or Return keys. If you’re not sure how a line of code should be entered, visit the website at www.wiley.com/go/bbcmicrobituserguide to download plain-text versions of each program; these can then be used for reference or even simply copied and pasted directly into the editors.
Comments, corrections, and questions from readers are heartily welcomed via email at microbit@halfacree.co.uk, while other publications of mine can be found at freelance.halfacree.co.uk.
You can also get in touch with me via Twitter at twitter.com/ghalfacree and via encrypted message at keybase.io/ghalfacree.
Enjoy the book, and happy travels on your BBC micro:bit journey!
—Gareth Halfacree
Part I
Chapter 1 Meet the BBC micro:bit
Chapter 2 Getting Started the BBC micro:bit
Chapter 3 Programming the BBC micro:bit
Chapter 1
In this chapter
 A look at what the BBC micro:bit is and how it came about
 A tour of the BBC micro:bit and an explanation of its major components
THE BBC MICRO:BIT is an incredible device, capable of educating and entertaining in equal measure. It can form the heart of a complex robotic or home automation system, or it can simply show a smiley face when you press a button. It can help you come to grips with programming, learn about how electronics work, and even communicate wirelessly with more BBC micro:bits or other devices such as a smartphone or tablet.
You can write programs for the BBC micro:bit in a variety of programming languages, or you can use programs others have written. You can use the BBC micro:bit in the classroom, the club, the playground, or at home. You can play games, solve problems, and invent new devices, all with your BBC micro:bit.
Before all this, though, you’ll need to meet the BBC micro:bit.
The BBC micro:bit is what is technically known as a microcontroller development board. That is, it’s a printed circuit board (PCB) which contains a microcontroller on which you can run your own programs and connect your own hardware.
The first microcontroller development boards were expensive and complicated to use. In the decades since their first introduction, they have become steadily cheaper and more accessible, until the BBC micro:bit became possible: a minimal-cost, highly-functional board designed to help teach programming, or ‘coding’, to anyone regardless of experience.
Your programming journey begins simply: learning about the BBC micro:bit itself.
The BBC micro:bit itself is a small printed circuit board with a range of components fitted. It has two sides: the front side of the BBC micro:bit includes the display and buttons, while the back side has components like the micro-USB connector and radio. Figure 1-1 shows the front side of the BBC micro:bit, and Figure 1-2 shows the back.
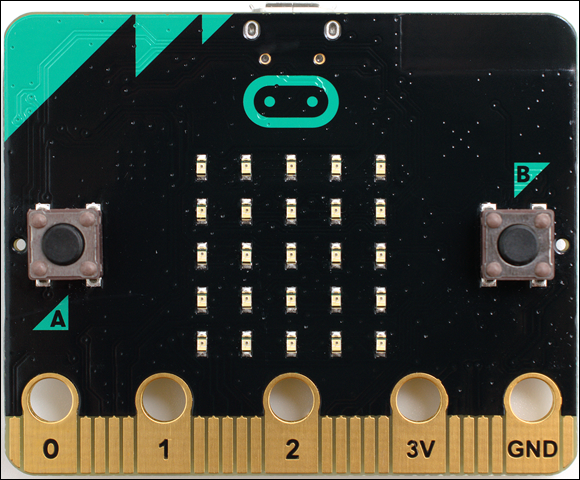
FIGURE 1-1: The front of the BBC micro:bit
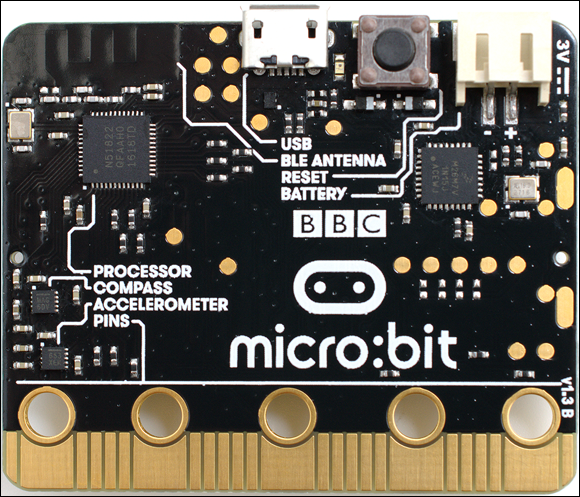
FIGURE 1-2: The back of the BBC micro:bit
The BBC micro:bit includes a layer of print known as a silkscreen layer, which labels some of the more important components. The buttons on the front side are labelled A and B so you know which is which, while the back side picks out key components like the processor and the accelerometer. These components, and others, are described in more detail in the next section.
Like any complex device, the BBC micro:bit is made up of numerous relatively simple parts. From the more obvious, like the display which dominates the front of the board, to the more subtle, like the radio which allows two or more BBC micro:bits to communicate with each other or connect to a smartphone or tablet, each component works with the others to give the BBC micro:bit its impressive flexibility.
If you’re impatient to get started with your BBC micro:bit, you can skip ahead to Chapter 2. Reading the rest of this chapter, though, will give you a good understanding of just what the BBC micro:bit can do, putting you in good stead for not only learning how it works but coming up with practical projects of your own as your skills progress.
The most obvious feature of the BBC micro:bit is its display, which sits in the centre of the board’s front side (see Figure 1-3). This is the BBC micro:bit’s primary output device, a means for a program running on the BBC micro:bit to communicate with the outside world—whether that’s reading off the position of one of the BBC micro:bit’s sensors or simply displaying a smiling face.
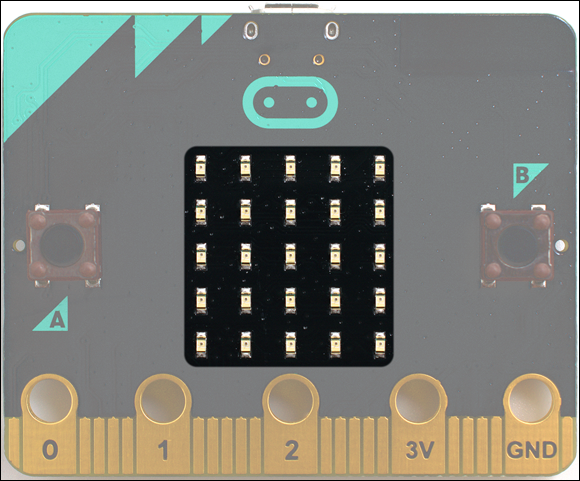
FIGURE 1-3: The BBC micro:bit’s display
The BBC micro:bit’s display serves the same purpose as the monitor on a desktop computer but is of a considerably lower resolution. Where a desktop monitor may be made up of 1,920 columns of 1,080 picture elements or pixels, the BBC micro:bit has just five columns of five picture elements for a total of 25 pixels.
Although 25 pixels may not sound like much, it’s more than enough to view useful information such as a bar graph or the elements of a simple game or to scroll messages of almost any length. You’ll learn more about using the display for these tasks and more later in the book.
From a technical perspective, the BBC micro:bit’s display is made up of a 5 × 5 light emitting diode (LED) matrix. Each LED in the matrix makes up one pixel and can display a single colour in varying brightnesses. By altering the brightness and rapidly changing the image being shown, the BBC micro:bit’s display can show animation as well as still images.
Next to the display, the buttons are the BBC micro:bit’s second most obvious feature. The two main buttons, Button A and Button B, are positioned either side of the display at the front of the board and are labelled with their letter to avoid any confusion (see Figure 1-4). These two buttons form the BBC micro:bit’s primary input devices. Where the display allows information to be output from a program running on the BBC micro:bit, the buttons allow you to send simple inputs into the program to change the image being displayed, for example, or control a character in a game.
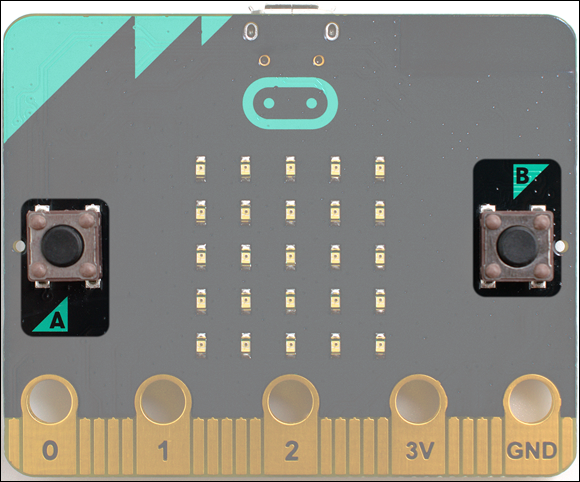
FIGURE 1-4: The BBC micro:bit’s Button A and Button B
These buttons are technically known as a momentary switch. These are different to the switches you might use to turn on a light, which are known as latching switches or toggle switches. A momentary switch stays ‘on’ only as long as you continue to push it down, while a latching switch goes from ‘off’ to ‘on’ and stays there until you push it again.
Although the buttons are permanently connected to the BBC micro:bit, they won’t do anything unless the program running on the BBC micro:bit is listening for a button input. Depending on what you’re using the BBC micro:bit for, you may want to use only one or even neither of the two buttons; alternatively, you may find you need more buttons, in which case the input-output pins will help you expand the BBC micro:bit.
In addition to Button A and Button B, there’s a third button on the back of the BBC micro:bit: the Reset button. Like the Reset button of a desktop computer, the BBC micro:bit’s Reset button acts like cutting the power. Whatever the BBC micro:bit is doing at the time will be interrupted, and the BBC micro:bit will restart and begin its stored program again from the start. The Reset button is useful when experimenting with programs that may cause the BBC micro:bit to stop responding, but be careful not to press it accidentally when you’re in the middle of something. There are other uses for the Reset button, too, which will be explained in later chapters.
The processor is often called the ‘brain’ of a computer, and the BBC micro:bit’s processor—technically known as a microcontroller—is no exception. Found on the upper-left of the rear of the BBC micro:bit and labelled on the board’s silkscreen layer, the processor is a tiny black square no bigger than your little fingernail called an integrated circuit (see Figure 1-5).
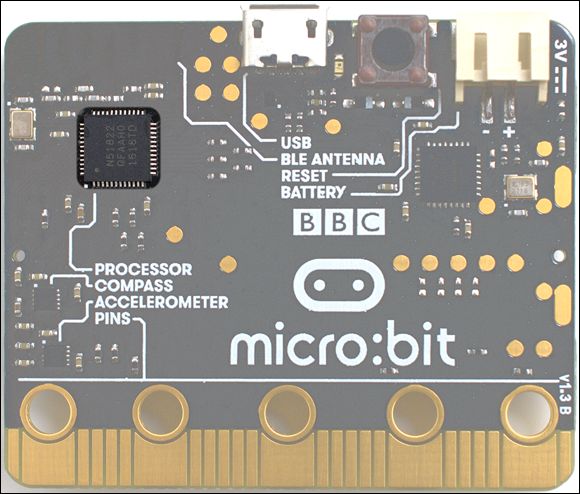
FIGURE 1-5: The BBC micro:bit’s processor
Despite its small size, this integrated circuit is surprisingly complex. It’s here that any program the BBC micro:bit is using is both stored and run. While in a desktop computer, memory, storage, and the central processing unit are all separate, the BBC micro:bit’s processor is all-in-one; this is known as a system-on-chip (SoC).
The BBC micro:bit’s processor uses a special set of instructions, known as an instruction set architecture, called the ARM Architecture. Named for the company which invented it, ARM processors are designed to offer high performance at the lowest possible power usage. The BBC micro:bit uses this to great effect: It’s possible to run the BBC micro:bit for months when using the recommended batteries.
For those interested in the technical side, the BBC micro:bit’s processor is a Nordic nRF51822, which contains a single-core ARM Cortex-M0 running at 16Mhz, with 16 KB of random access memory (RAM) and 256 KB of non-volatile memory (NVM) for program storage.
The BBC micro:bit also has a second processor, not labelled on the silkscreen and found at the upper-right of the board. When you connect the BBC micro:bit to your computer using a micro-USB cable, as described in Chapter 3, ‘Programming the BBC micro:bit’, this second processor takes over and handles communication with your computer, accepting new programs and transferring them to the main processor to run.
A major feature of the BBC micro:bit is its radio, which allows it to communicate with other BBC micro:bits or with other devices, such as a smartphone or tablet. The radio itself is a part of the BBC micro:bit’s main processor, forming a segment of the system that makes up the system-on-chip design. As a result you won’t find it labelled on the silkscreen as with other components, but instead covered under the ‘PROCESSOR’ label.
The BBC micro:bit’s radio has two main functions. The first function is to communicate with other BBC micro:bits wirelessly, allowing you to group multiple BBC micro:bits without having to string cables between them. The second function is to communicate with other devices, which it does using Bluetooth Low Energy (BLE), a low-power version of the popular Bluetooth wireless standard built into most modern smartphones and tablets.
Unlike the type of radio you might use to listen to music, there’s no external antenna for the BBC micro:bit’s radio chip. Instead, it uses a cleverly-shaped copper track built into the circuit board itself. You can find this at the upper-left on the rear of the BBC micro:bit, labelled ‘BLE ANTENNA’ (see Figure 1-6). It doesn’t look like much, but if you hold it to the light, you should be able to see a raised line tracing a series of rectangular shapes—providing, that is, the antenna isn’t covered by regulatory compliance stickers required of all radio transmitters in selected countries.
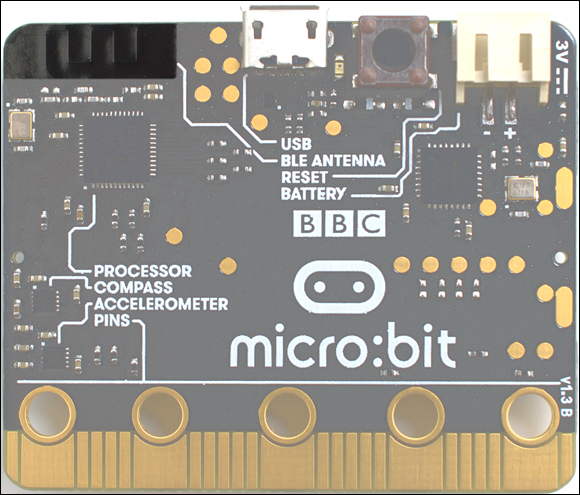
FIGURE 1-6: The BBC micro:bit’s radio antenna
One of two built-in sensors, the BBC micro:bit’s accelerometer is an integrated circuit even smaller than the processor chips (see Figure 1-7). It’s so small that if it weren’t labelled on the board’s rear silkscreen, it’d be easy to overlook it. Despite its small size, this chip is extremely clever: it knows exactly how the BBC micro:bit is positioned in space at any given time.
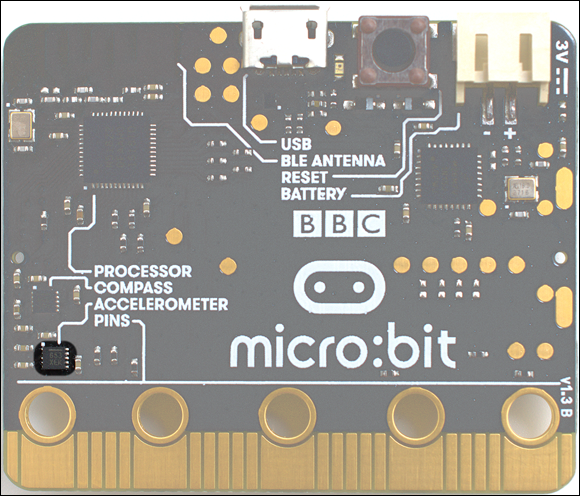
FIGURE 1-7: The BBC micro:bit’s accelerometer
When you rotate your smartphone from portrait to landscape and vice versa, it’s an accelerometer that tells the device what you’ve done and allows it to automatically rotate the screen. The BBC micro:bit’s accelerometer works in the same way: it can track the angle of the device in all three axes—sideways, backward and forward, and up and down, or X, Y, and Z—by tracking what is known as proper acceleration.
The accelerometer can be seen in action during the BBC micro:bit’s demonstration program, which is explored in Chapter 2.
The second of the BBC micro:bit’s two built-in sensors, the compass, works roughly like the navigational tool of the same name: the compass will detect magnetic north and point you in that direction. If you’re building a robot, for example, the compass is a reliable method of navigating between points. As with the accelerometer, the compass is a tiny and easily-overlooked integrated circuit on the rear of the device and is labelled on the silkscreen (see Figure 1-8).
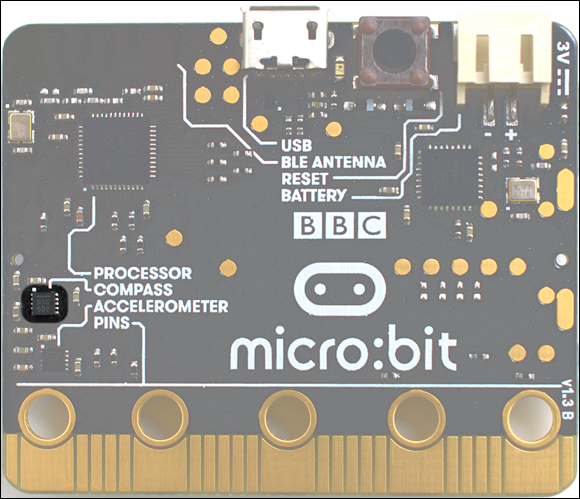
FIGURE 1-8: The BBC micro:bit’s compass
Like a traditional needle-based compass, the BBC micro:bit’s compass works by sensing magnetic fields. As a result, it has a second trick up its sleeve: the ability to detect magnetic fields other than the Earth’s natural ones. Using this chip, the BBC micro:bit can not only point the way north but can also indicate the strength of a local field’s magnetic force—and even detect metal. As it works by detecting these magnetic fields, however, this means that nearby magnets—such as those found in speakers—can affect the sensor’s accuracy when used as a compass.
The BBC micro:bit has room for expansion in the form of input-output pins located on the bottom edge (see Figure 1-9). These aren’t literally pins but strips of copper on both sides of the BBC micro:bit’s printed circuit board; the term ‘pin’ is a technical term referring not to the connections themselves but to the ‘pin’ of the processor to which the connections are linked.
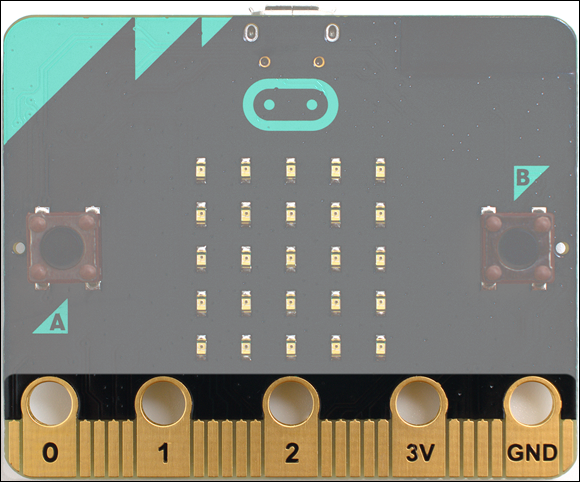
FIGURE 1-9: The BBC micro:bit’s input-output pins
The five largest pins, sometimes referred to as pads or rings in reference to their shape, are labelled on the front of the board: 0, 1, 2, 3V, and GND. The first three are the BBC micro:bit’s major input output pins themselves, while the latter two provide power and a ground connection to complete any circuit you build. Each of these pins have a small hole at the top, which allows you to quickly connect hardware to the BBC micro:bit using crocodile clip or banana plug connectors. They’re also suitable for use with conductive thread (see Chapter 12, ‘The Wearable BBC micro:bit’) and sometimes via small conductive screws, as with add-on boards (see Chapter 11, ‘Extending the BBC micro:bit’).
As the name suggests, the input-output pins can be used for either sending an input to the BBC micro:bit or taking an output from the BBC micro:bit. You could connect a temperature sensor to Pin 0, for example, while using Pin 1 to light up an LED or sound an alarm when the temperature rises above a certain level. You’ll learn more about this in Chapter 10, ‘Building Circuits’.
As well as the five large pins, the BBC micro:bit has a further 20 smaller pins. Unlike the large pins, these don’t have holes for crocodile clips or banana plugs. Instead, using these requires an edge connector, as demonstrated in Chapter 11, ‘Extending the BBC micro:bit’. Most micro:bit projects only need the three main input-output pins; the remaining pins are provided for more complicated projects.
The BBC micro:bit’s micro-USB port can be found to the middle of the upper rear edge (see Figure 1-10) and serves two purposes: It provides power to the BBC micro:bit when you’re not using a battery pack, and it allows you to connect the BBC micro:bit to your computer to change its program and communicate data back and forth. These uses are explained in full starting in Chapter 2.
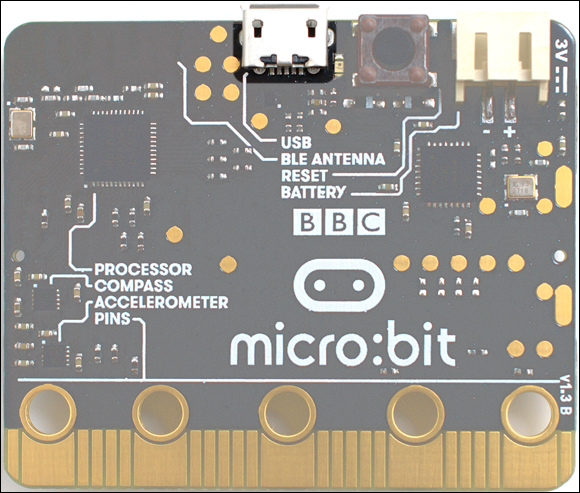
FIGURE 1-10: The BBC micro:bit’s USB port
When using the micro-USB port, it’s important to be careful and gentle. The inner connector is fragile, and if you damage it—such as by forcing a micro-USB connector in upside down or forcing a mini-USB, Lighting, or USB Type C connector into the micro-USB port—you won’t be able to connect the BBC micro:bit to your PC any more. The port should also not be used to connect the BBC micro:bit to high-speed USB chargers, special USB charging ports, or high-power USB battery packs, which can potentially damage the BBC micro:bit. More information on this can be found on the official safety advice notice at microbit.org/guide/safety-advice.
The micro-USB connector is commonly used in smartphones and tablets, and if you have a micro-USB cable for these, it should work fine for the BBC micro:bit, too. The only exception is in charging-only cables, often sold with power supplies and USB batteries, which don’t have their data connections in place. If you connect the BBC micro:bit to your PC and it doesn’t seem to be working, try a different micro-USB cable.
The BBC micro:bit’s small size, built-in display and sensors, and compatibility with conductive thread make it a great choice for portable and wearable projects, but having to power it from your PC or laptop is less convenient. That’s where the battery connector comes in. This connector, on the top-right of the rear of the BBC micro:bit (see Figure 1-11), lets you connect a 3V battery pack to the BBC micro:bit and power your project on-the-go.
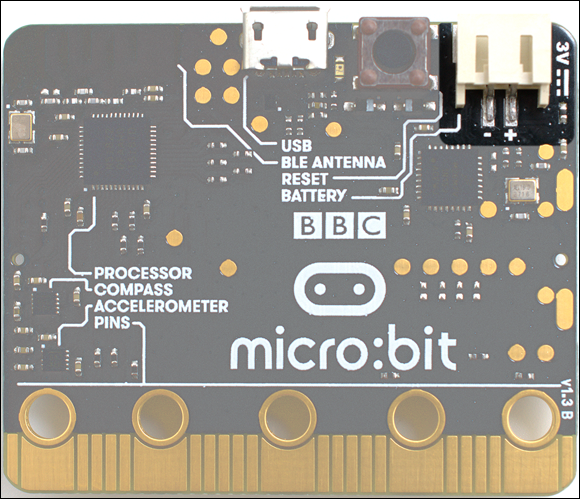
FIGURE 1-11: The BBC micro:bit’s battery connector
The connector is technically known as a JST connector. Not all batteries with a JST connector are suitable for use with the BBC micro:bit. Make sure that any battery pack you buy is listed as compatible and has been properly tested with the BBC micro:bit. These battery packs should only ever be used with standard disposable alkaline batteries. Rechargeable batteries use a lower voltage—1.2V rather than 1.5V—meaning the BBC micro:bit may not be able to get enough power and may be damaged.
A battery pack is provided with the BBC micro:bit Go bundle and with many third-party BBC micro:bit kits. If buying a battery pack separately to a BBC micro:bit, always check with the manufacturer or supplier that it is compatible; connecting a battery pack of the wrong voltage or polarity could damage your BBC micro:bit.
Chapter 2
In this chapter
 How to handle your BBC micro:bit safely and protect it against damage
 How to power your BBC micro:bit via USB or battery
 Exploring the BBC micro:bit’s introductory program
 An overview of the BBC micro:bit’s various inputs and outputs
HAVING EXPLORED YOUR BBC micro:bit’s hardware in Chapter 1, ‘Meet the BBC micro:bit’, it’s time to get down to the fun part: actually plugging it in and making it do things. Your BBC micro:bit can take its power from either your computer or a battery pack, and it comes complete with a preloaded sample application to help you get to grips with its various capabilities.
If you’ve already been using the BBC micro:bit and want to get started writing your own programs rather than using someone else’s, feel free to jump ahead to Chapter 3, ‘Programming the BBC micro:bit’, for an introduction to loading new applications onto its memory.