Teach Yourself VISUALLY™ Microsoft 365
Copyright © 2022 by John Wiley & Sons, Inc., Indianapolis, Indiana
Published by John Wiley & Sons, Inc., Hoboken, New Jersey.
Published simultaneously in Canada.
978-1-119-89351-6
978-1-119-89310-3 (ebk.)
978-1-119-89364-6 (ebk.)
No part of this publication may be reproduced, stored in a retrieval system, or transmitted in any form or by any means, electronic, mechanical, photocopying, recording, scanning, or otherwise, except as permitted under Section 107 or 108 of the 1976 United States Copyright Act, without either the prior written permission of the Publisher, or authorization through payment of the appropriate per-copy fee to the Copyright Clearance Center, Inc., 222 Rosewood Drive, Danvers, MA 01923, (978) 750-8400, fax (978) 750-4470, or on the web at www.copyright.com. Requests to the Publisher for permission should be addressed to the Permissions Department, John Wiley & Sons, Inc., 111 River Street, Hoboken, NJ 07030, (201) 748-6011, fax (201) 748-6008, or online at www.wiley.com/go/permission.
LIMIT OF LIABILITY/DISCLAIMER OF WARRANTY: THE PUBLISHER AND THE AUTHOR MAKE NO REPRESENTATIONS OR WARRANTIES WITH RESPECT TO THE ACCURACY OR COMPLETENESS OF THE CONTENTS OF THIS WORK AND SPECIFICALLY DISCLAIM ALL WARRANTIES, INCLUDING WITHOUT LIMITATION WARRANTIES OF FITNESS FOR A PARTICULAR PURPOSE. NO WARRANTY MAY BE CREATED OR EXTENDED BY SALES OR PROMOTIONAL MATERIALS. THE ADVICE AND STRATEGIES CONTAINED HEREIN MAY NOT BE SUITABLE FOR EVERY SITUATION. THIS WORK IS SOLD WITH THE UNDERSTANDING THAT THE PUBLISHER IS NOT ENGAGED IN RENDERING LEGAL, ACCOUNTING, OR OTHER PROFESSIONAL SERVICES. IF PROFESSIONAL ASSISTANCE IS REQUIRED, THE SERVICES OF A COMPETENT PROFESSIONAL PERSON SHOULD BE SOUGHT. NEITHER THE PUBLISHER NOR THE AUTHOR SHALL BE LIABLE FOR DAMAGES ARISING HEREFROM. THE FACT THAT AN ORGANIZATION OR WEBSITE IS REFERRED TO IN THIS WORK AS A CITATION AND/OR A POTENTIAL SOURCE OF FURTHER INFORMATION DOES NOT MEAN THAT THE AUTHOR OR THE PUBLISHER ENDORSES THE INFORMATION THE ORGANIZATION OR WEBSITE MAY PROVIDE OR RECOMMENDATIONS IT MAY MAKE. FURTHER, READERS SHOULD BE AWARE THE INTERNET WEBSITES LISTED IN THIS WORK MAY HAVE CHANGED OR DISAPPEARED BETWEEN WHEN THIS WORK WAS WRITTEN AND WHEN IT IS READ.
For general information on our other products and services or for technical support, please contact our Customer Care Department within the United States at (800) 762-2974, outside the United States at (317) 572-3993 or fax (317) 572-4002.
Wiley also publishes its books in a variety of electronic formats. Some content that appears in print may not be available in electronic formats. For more information about Wiley products, visit our web site at www.wiley.com.
Library of Congress Control Number: 2022930947
Trademarks Wiley, the Wiley logo, Visual, the Visual logo, Teach Yourself VISUALLY, Read Less - Learn More and related trade dress are trademarks or registered trademarks of John Wiley & Sons, Inc. and/or its affiliates. Microsoft 365 is a trademark of Microsoft Corporation. All other trademarks are the property of their respective owners. John Wiley & Sons, Inc. is not associated with any product or vendor mentioned in this book. Teach Yourself Visually™ Microsoft 365 is an independent publication and is neither affiliated with, nor authorized, sponsored, or approved by Microsoft Corporation.
Cover images: © Paul McFedries
Cover design: Wiley
About the Author
Paul McFedries is a full-time technical writer. Paul has been authoring computer books since 1991, and he has more than 100 books to his credit. Paul’s books have sold more than four million copies worldwide. These books include the Wiley titles Teach Yourself VISUALLY Windows 11, Teach Yourself VISUALLY Excel 2016, Excel Workbook For Dummies, Excel All-in-One For Dummies, and Excel Data Analysis For Dummies, Fifth Edition. Paul invites you to drop by his personal website at www.paulmcfedries.com or follow him on Twitter @paulmcf.
Author’s Acknowledgments
It goes without saying that writers focus on text, and I certainly enjoyed focusing on the text that you’ll read in this book. However, this book is more than just the usual collection of words and phrases. A quick thumb-through of the pages will show you that this book is also chock-full of images, from sharp screenshots to fun and informative illustrations. Those colorful images sure make for a beautiful book, and that beauty comes from a lot of hard work by Wiley’s immensely talented group of designers and layout artists. I thank them for creating another gem. Of course, what you read in this book must also be accurate, logically presented, and free of errors. Ensuring all of this was an excellent group of editors that included project editor Lynn Northrup, technical editor Doug Holland, copy editor Kim Wimpsett, and production editor Barath Kumar Rajasekaran. Thanks to all of you for your exceptional competence and hard work. Thanks, as well, to acquisitions editor Devon Lewis for asking me to write this book.
How to Use This Book
Who This Book Is For
This book is for the reader who has never used this particular technology or software application. It is also for readers who want to expand their knowledge.
The Conventions in This Book
 Steps
Steps
This book uses a step-by-step format to guide you easily through each task. Numbered steps are actions you must do; bulleted steps clarify a point, step, or optional feature; and indented steps give you the result.
 Notes
Notes
Notes give additional information — special conditions that may occur during an operation, a situation that you want to avoid, or a cross reference to a related area of the book.
 Icons and Buttons
Icons and buttons show you exactly what you need to click to perform a step.
 Tips
Tips
Tips offer additional information, including warnings and shortcuts.
 Bold
Bold
Bold type shows command names, options, and text or numbers you must type.
 Italics
Italic type introduces and defines a new term.

PART I
Microsoft 365 Features
The Microsoft 365 applications share a common look and feel. You can find many of the same features in each program, such as the Ribbon, Quick Access Toolbar, program window controls, and the File tab. Many of the tasks you perform, such as creating and working with files, share the same processes and features throughout the Microsoft 365 suite. In this part, you learn how to navigate the common Microsoft 365 features and basic tasks.

CHAPTER 1
Microsoft 365 Basics
Start and Exit Microsoft 365 Apps
A Microsoft 365 installation creates an icon for each Microsoft 365 app either on the Start menu or in the All Apps list. To work with an app, you need to know how to launch the app on your PC. When you are finished with an app, you also need to know how to exit the app.
This section uses Word to demonstrate how to open an app from Windows 11. Once a Microsoft 365 app opens, its Start screen appears, where you can find a recent document or start a new document. For other ways to open or create a document, see Chapter 2.
Start and Exit Microsoft 365 Apps
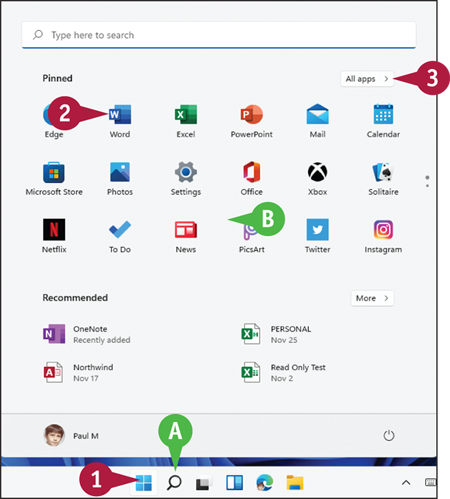
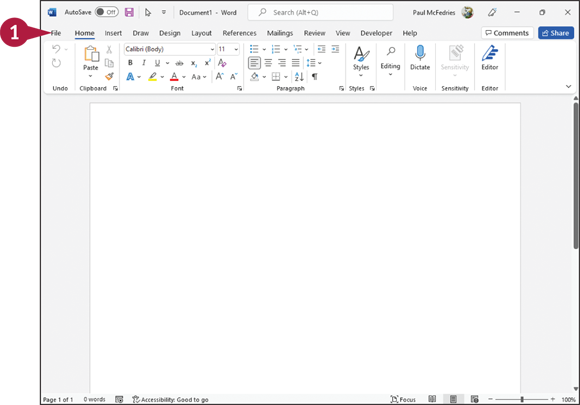
Click Start ( ).
).
The Start menu appears.
 Alternatively, you can click Search (
 ), type the name of the app, and then click the app in the search results.
Click the Microsoft 365 app you want to start.
Note: If you do not see the Microsoft 365 app you want, skip to step 3.
Click All apps.
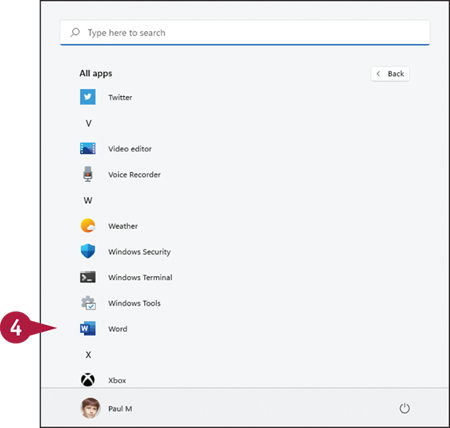
Windows displays the All Apps list.
Click the app you want to open.
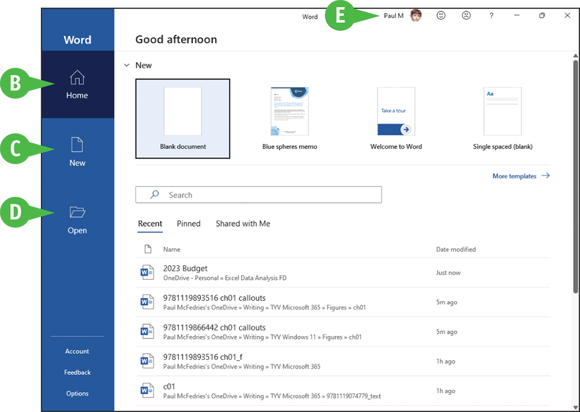
The app launches and displays its Start screen.
 You can use the Home panel to start a blank document or open a recent document.
 You can use the New panel to start a new document.
 You can use the Open panel to open an existing document.
 This area indicates whether you have signed in to your Microsoft 365 subscription.
Note: See Chapter 4 for details about signing in to Microsoft 365.
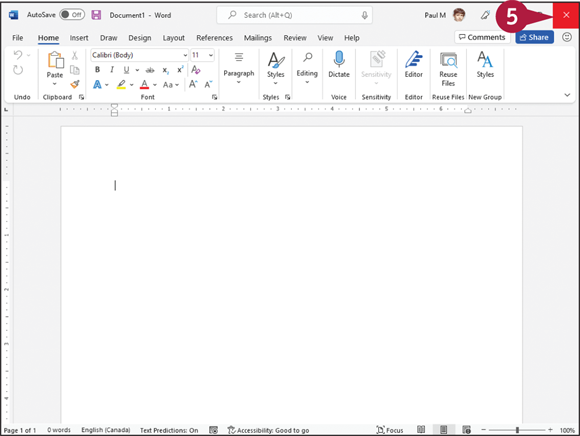
To exit the app, click the Close button ( ).
).
Note: If you have multiple documents open, you must click Close () for each file to exit the app.
Explore the App Window
All Microsoft 365 apps share a common appearance and many of the same features, and when you learn the features of one Microsoft 365 app window, you can use the same skills to navigate the windows of the other Microsoft 365 apps. These common features include the title bar, program window controls, zoom controls, and the Ribbon. The Ribbon is an important Microsoft 365 feature because it contains the app commands and features that you will use most often. You learn more about the Ribbon later in this chapter.
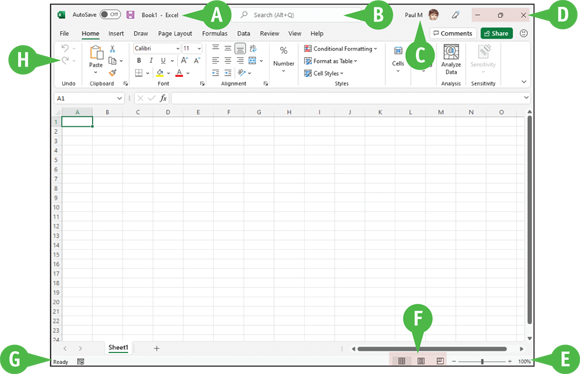
Title Bar
Displays the name of the open file, the name of the Microsoft 365 app, and the AutoSave and Save buttons.
Search
Enables you to search for items within the app.
Microsoft 365 Indicator
Displays your Microsoft 365 sign-in status. If you see your name, you are signed in to your Microsoft 365 subscription. You can click your name to display a menu that enables you to manage your Microsoft account settings or switch to a different Microsoft account. If you are not signed in, this area shows a Sign In link.
Program Window Controls
Enable you to control the appearance of the app window. You can minimize the Ribbon, and you can minimize, maximize, restore, or close the app window.
Zoom Controls
Change the magnification of a document.
 View Shortcuts
Switch to a different view of your document.
 Status Bar
Displays information about the current Microsoft 365 document.
 Ribbon
Displays groups of related commands in tabs. Each tab offers buttons for performing common tasks.
Work with Backstage View
You can click the File tab to display Backstage view. In Backstage view, you find a list of actions that you can use to open, save, print, remove sensitive information, and distribute documents as well as modify the app’s settings. You can also use Backstage view to manage the places on your computer hard drive or in your network that you use to store documents and to manage your Microsoft 365 account.
Work with Backstage View

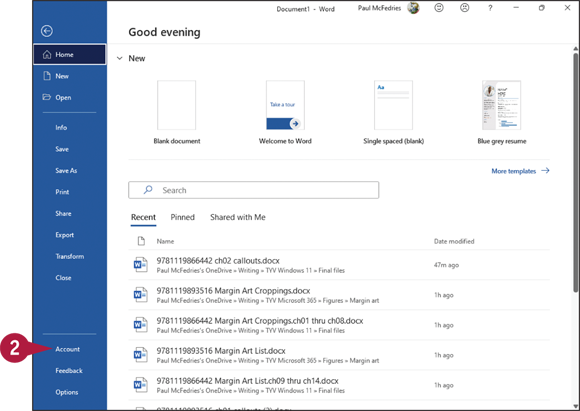
Click the File tab to display Backstage view.
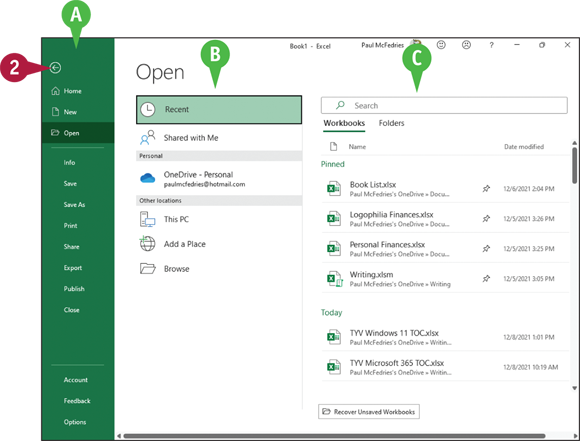
Commonly used file and app management commands appear here.
Buttons you can click appear here.
Information related to the button you click appears here. Each time you click a button, the information shown to the right changes.
Note: The Home, New, Close, and Options commands do not display buttons or information, but take other actions.
Click the Back button ( ) to return to the open document.
Change the Color Scheme
You can use Microsoft 365 themes and background patterns to change the appearance of the app screen. Themes control the color scheme the app uses, and background patterns can add interest to Backstage view. Color schemes can improve your ability to clearly see the screen, but be aware that some schemes might be distracting.
Microsoft 365 themes are available even if you are not signed in to Microsoft 365, but to use background patterns, you must sign in to Microsoft 365. For details on how to sign in and out of Microsoft 365, see Chapter 4.
Change the Color Scheme
Note: Make sure you are signed in to Microsoft 365. See Chapter 4 for details.
Click File to open Backstage view.
Click Account.
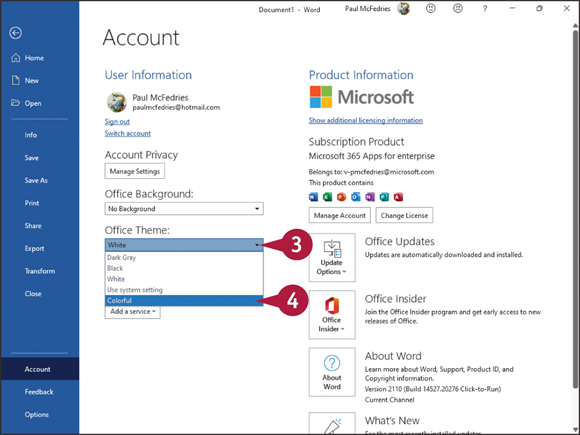
Click the Office Theme  .
.
Click a theme.
The colors of your app change.
Note: Some theme changes are more subtle than others.
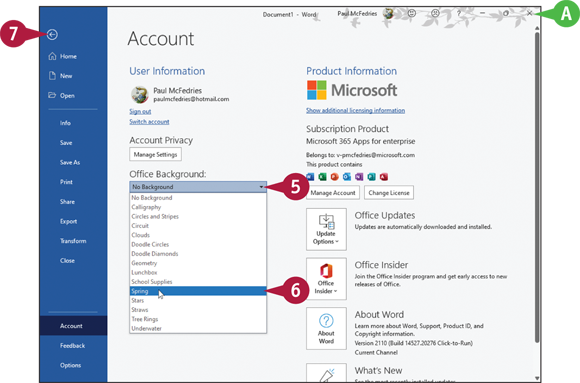
Click the Office Background .
Click the pattern you want to use or click No Background.
As you point the mouse ( ) at a choice in the menu, a background pattern appears at the top of the window. The pattern appears only in Backstage view; it does not appear as you work on documents.
 Click the Back button () to return to your document.
The Microsoft 365 theme you selected appears.
Search for a Ribbon Command
All the Microsoft 365 apps enable you to search for Ribbon commands. Searching can be useful when you need to perform a task that you do not perform regularly and so are not sure where to find the command you need. Rather than wasting time looking through various Ribbon tabs and groups, the Search feature can help. By entering some or all of the command name, the Search features can take you directly to the command you want to run. You can still use the Ribbon directly, as described in the next section, “Work with the Ribbon.”
Search for a Ribbon Command
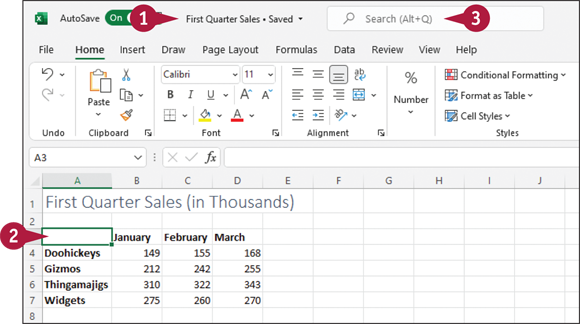
Open a document in a Microsoft 365 app.
Note: See Chapter 2 for details on opening a Microsoft 365 document.
Select an object or some text in the document, if required by the Ribbon command you want to run.
Click inside the Search text box.
Note: You can also select the Search text box by pressing  +
+  .
.
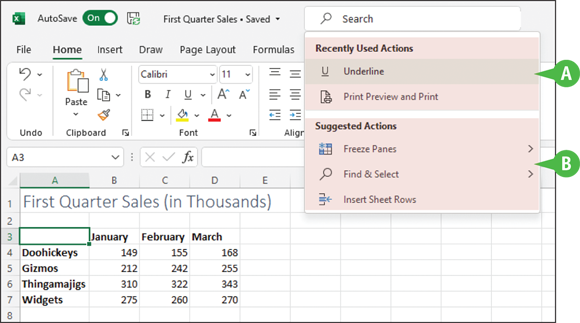
A list of your recent Ribbon commands appears in the Recently Used Actions section.
A list of suggested Ribbon commands appears in the Suggested Actions section.
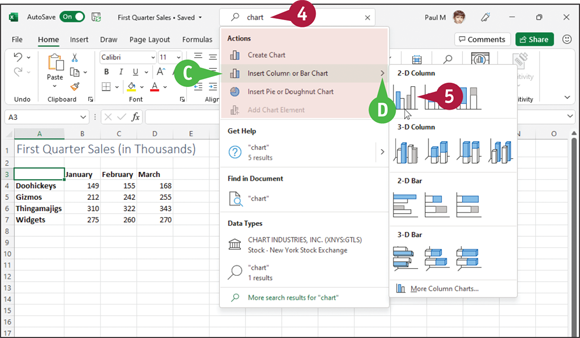
Type the name or a brief description of the command you want to run.
The app lists possible commands you can use to complete your task.
Click a command to use it.
Commands with arrows ( ) display additional commands.
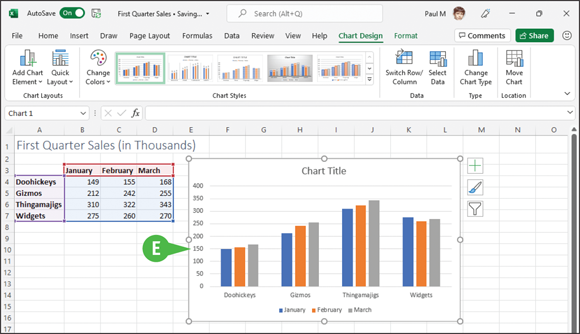
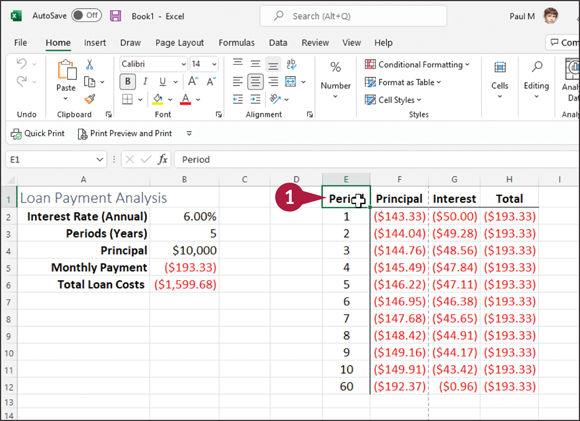
The app performs the action you selected; in this example, Excel charts the worksheet data.
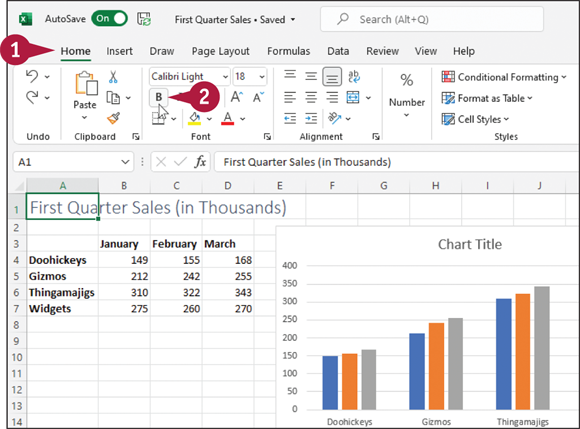
Work with the Ribbon
You use the Ribbon to access an app’s commands. The Ribbon is divided into tabs, the names of which vary depending on the app. Excel’s Ribbon, for example, includes tabs named Home, Insert, Formulas, and Data. Each Ribbon tab is divided into groups of related commands. The Home tab includes the Clipboard group for copying and pasting data and the Font group for applying text formatting.
Each Ribbon command does one of four things: run a task, display a menu of commands, display a gallery, or launch a dialog box.
Work with the Ribbon
Run a Command
Click the tab containing the command you want to use.
Click the command.
The app runs the command.
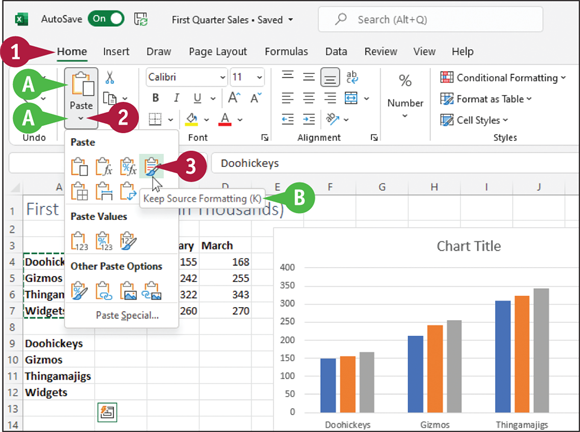
Run a Command from a Menu
Click the tab containing the menu you want to use.
Many Ribbon buttons have two parts: The top part runs the standard command, and the bottom part displays the menu.
Click the button’s arrow ().
A menu of additional commands appears.
Hover the mouse () over a command to see a tooltip that displays the command’s name.
Click the command you want to run.
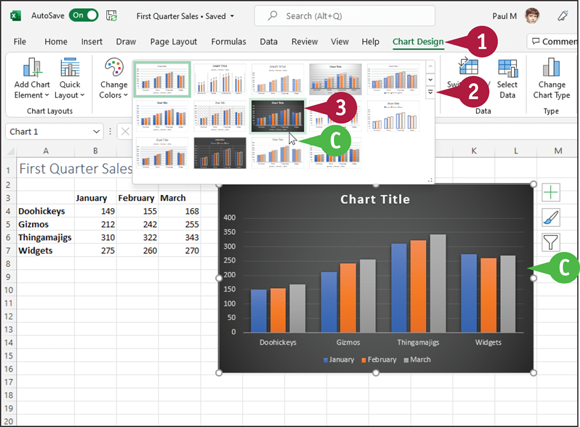
Choose an Item from a Gallery
Click the tab containing the gallery you want to display.
Click the gallery’s More button ( ).
).
Click the gallery item you want to apply.
When you hover the mouse () over a gallery item, the app displays a preview of the effect.
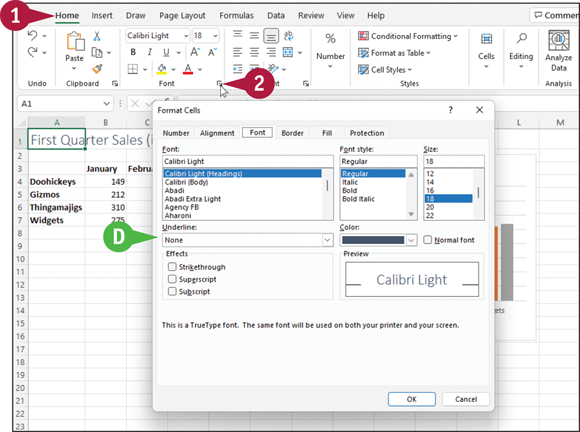
Launch a Dialog Box
Click the tab containing the group you want to work with.
Click the group’s dialog box launcher ( ).
).
The app displays a dialog box containing additional settings related to the group.
Customize the Quick Access Toolbar
The Quick Access Toolbar offers one-click access to your frequently used commands. The Quick Access Toolbar is hidden by default, so to use it you must first display it. Its default position is below the Ribbon. Also by default, the Quick Access Toolbar either is empty or contains just one or two buttons, so you must customize this toolbar to add the commands you use often, such as the New, Open, Save, and Quick Print commands.
You can also reposition the Quick Access Toolbar so that it appears above the Ribbon, and you can configure it to show only the command icons.
Customize the Quick Access Toolbar
Display the Quick Access Toolbar
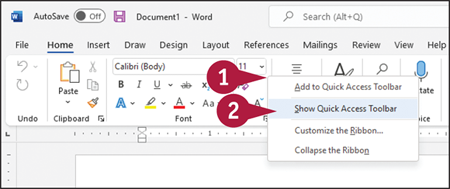
Right-click the Ribbon.
Click Show Quick Access Toolbar.
The app displays the Quick Access Toolbar below the Ribbon.
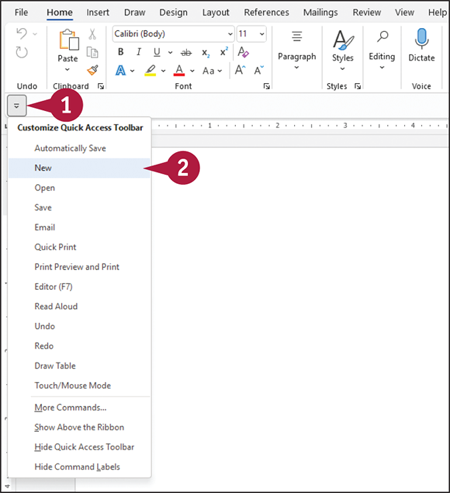
Add Commands to the Quick Access Toolbar
On the Quick Access Toolbar, click the More button ().
Click a command.
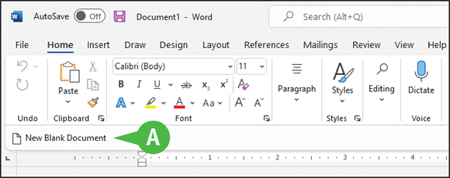
The app adds the command to the Quick Access Toolbar.
Repeat steps 1 and 2 in this subsection for each command you want to add.
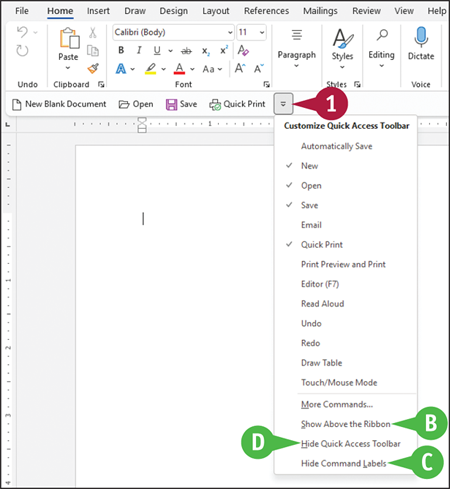
Customize the Quick Access Toolbar
On the Quick Access Toolbar, click the More button ().
You can click Show Above the Ribbon if you want to display the Quick Access Toolbar above the Ribbon.
You can click Hide Command Labels to display just the command icons on the Quick Access Toolbar.
You can click Hide Quick Access Toolbar if you want to temporarily remove the toolbar from the app window.
Using a Microsoft 365 App with a Touch Screen
If you use Microsoft 365 on a touch-screen device, you can take advantage of Touch mode to make using the apps easier and more efficient. You can configure the Quick Access Toolbar with a command that toggles between the default Mouse mode and the tablet-friendly Touch mode.
In Mouse mode, the Quick Access Toolbar and Ribbon button are closely spaced because it is relatively easy to select buttons accurately with a mouse. In Touch mode, the Quick Access Toolbar and Ribbon buttons are spaced farther apart to make it easier to select buttons accurately by tapping them with a finger.
Using a Microsoft 365 App with a Touch Screen
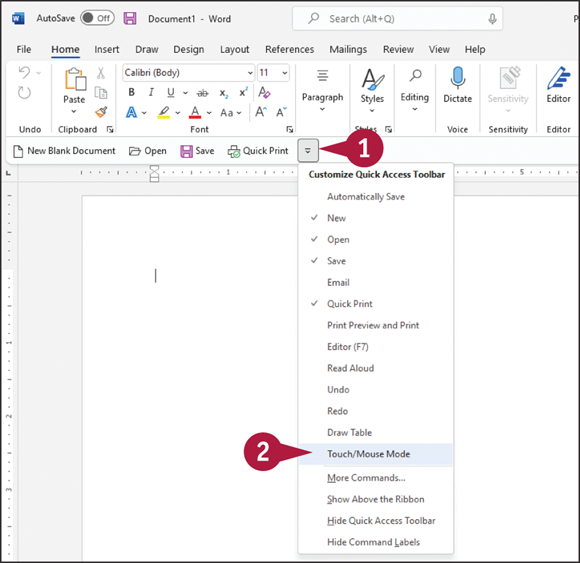
Add Touch/Mouse Mode to the Quick Access Toolbar
On the Quick Access Toolbar, tap the More button ().
Note: If you do not see the Quick Access Toolbar, see the previous section, “Customize the Quick Access Toolbar,” to learn how to display it.
Tap Touch/Mouse Mode.
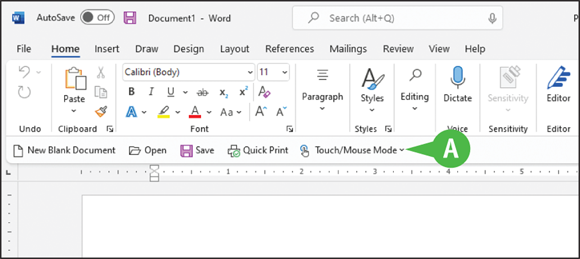
The Touch/Mouse Mode command appears on the Quick Access Toolbar.
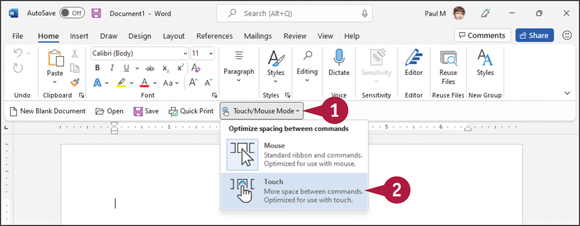
Switch to Touch Mode
On the Quick Access Toolbar, tap Touch/Mouse Mode.
Tap Touch.
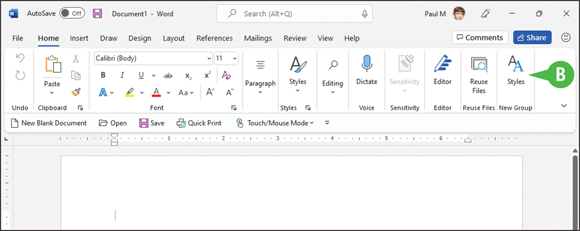
The Microsoft 365 app increases the spacing between the buttons on the Quick Access Toolbar and the Ribbon, grouping Ribbon buttons as needed.
CHAPTER 2
Working with Files
Create a New File
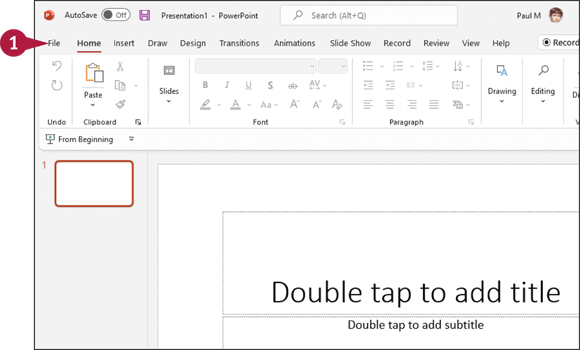
When you are ready to create new content, rather than adding to an existing document, you can create a new file. The Start screen that appears when you open a Microsoft 365 app (except Outlook, OneNote, and Teams) enables you to create a new file, as described in Chapter 1. If Word, Excel, PowerPoint, Access, or Publisher is already open and you want to create a new document, workbook, presentation, database, or publication, you create a new file using Backstage view. You have the option of creating a blank file or basing the file on a template.
Create a New File
Create a New Blank File
Click the File tab.
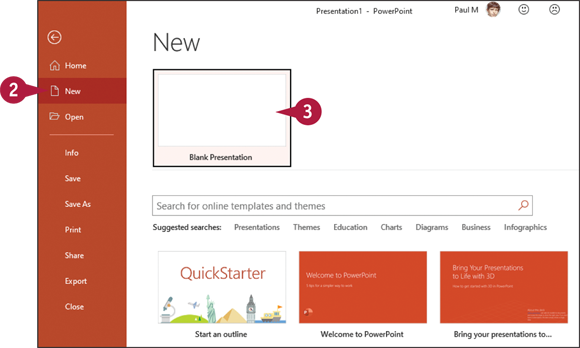
Click New.
The New screen appears.
Click the Blank Type thumbnail, where Type is the type of file, such as Document (Word), Workbook (Excel), or Presentation (PowerPoint).
Create a New File from a Template
Click the File tab (not shown).
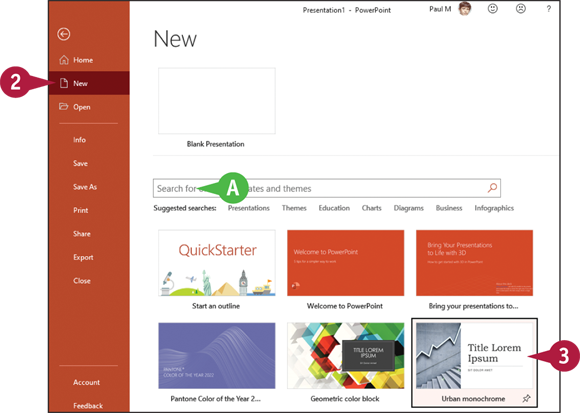
Click New.
The New screen appears.
Click the template that represents the type of file that you want to create.
You can use this Search box to search for the template you want.
Note: A template contains predefined text and formatting that serve as the starting point for your document, saving you the effort of manually adding that text and formatting it.
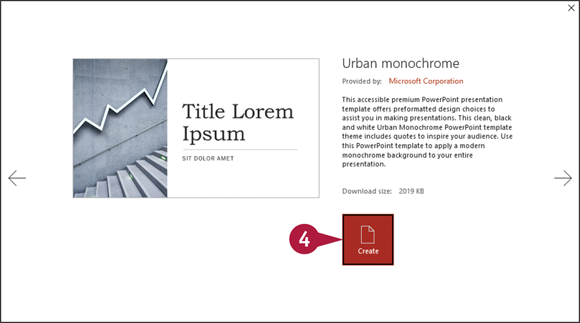
A preview and description of the template appears.
Click Create.
The Microsoft 365 app creates and then opens a new file based on the template.
Save a File
You save files you create in Microsoft 365 apps so that you can use them at another time. When you save a file, you can give it a unique filename and store it in the folder or drive of your choice.
After you save a file for the first time, you can click the Save button ( ) in the app’s title bar to save it again. The first time you save a file, the app prompts you for a filename. Subsequent times, when you use the Save button () in the title bar, the app saves the file using its original name without prompting you.
Save a File
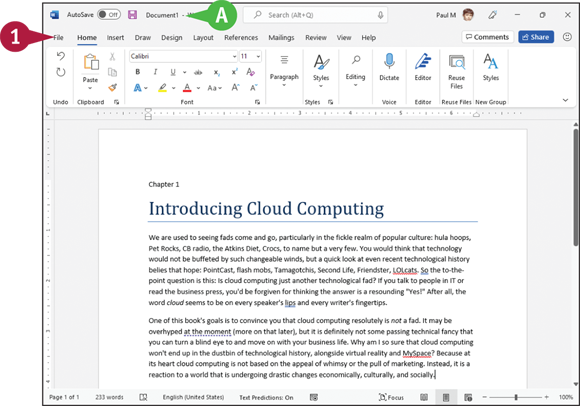
Before you save a file, the app displays a generic name in the title bar (such as Document1 for a Word document, as shown here).
Click the File tab.
Backstage view appears.
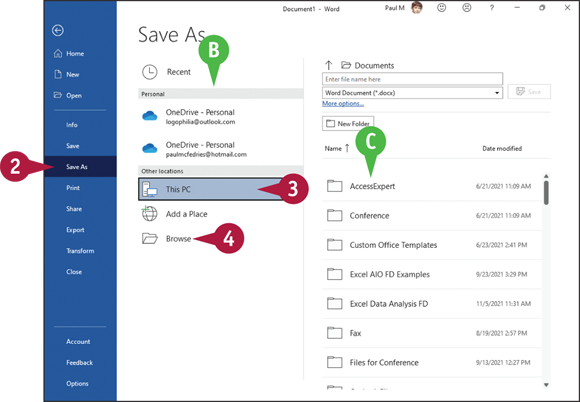
Click Save As.
Locations where you can save files appear here.
Note: Once you select a location, folders available at that location appear on the right side of the screen.
Click the location where you want to save the file; this example uses This PC.
If the folder in which you want to save the document appears here, click it and skip to step 5.
Click Browse.
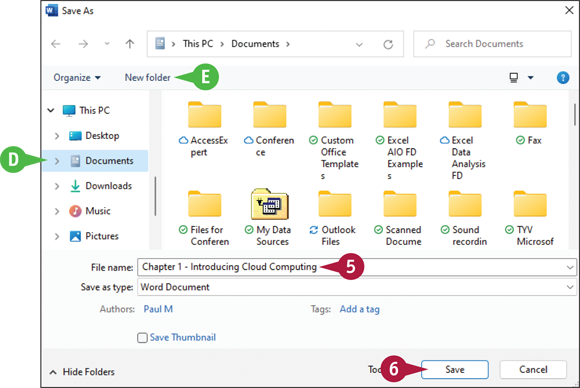
The Save As dialog box appears.
Type a name for the document.
You can click in the folder list to select a location on your computer in which to save the document.
You can click New folder to create a new folder in which to store the document.
Click Save.
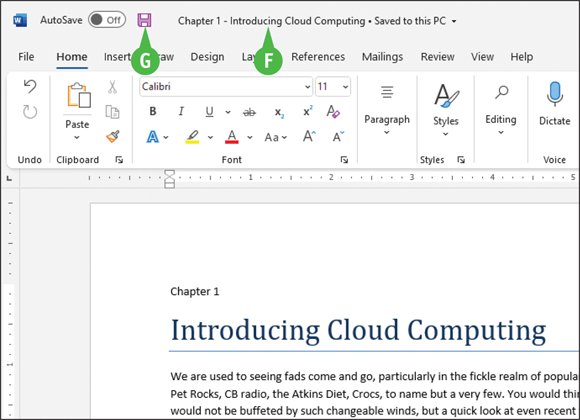
Word saves the document and displays the name you supplied in the title bar.
For subsequent saves, you can click the Save button () on the Quick Access Toolbar to quickly save the file.
Open a File
You can open documents that you have saved previously to continue adding data or to edit existing data. If you are not sure where you saved a file, you can use the Open dialog box’s Search function to locate it.
In Word, you can open and edit PDF files. Because Word optimizes PDF files to enable you to edit text, editing a PDF file in Word works best if you used Word to create the original PDF file. If you used a different app to create the PDF file, the result might not look exactly like the original PDF.
Open a File
Click the File tab (not shown).
Backstage view appears.
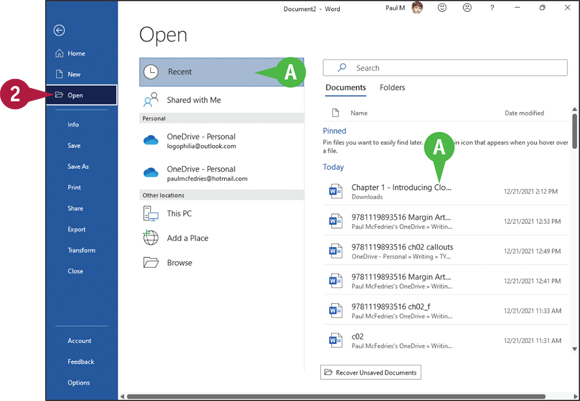
Click Open.
By default, the Microsoft 365 app displays recently opened documents. If you see the file you want to open, you can click it to open it and skip the rest of these steps.
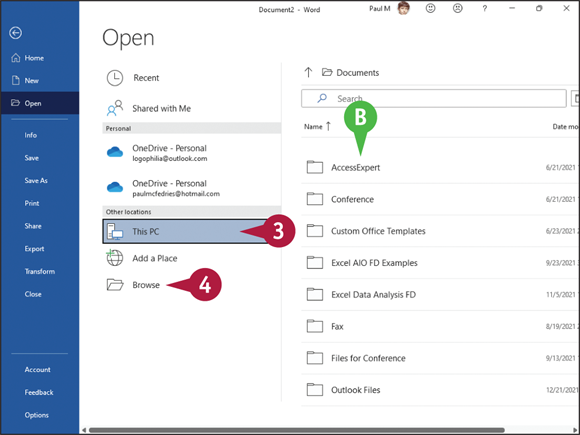
Click the place where you believe the document is stored. This example uses This PC.
If the folder containing the document appears here, click it and skip to step 6.
Click Browse.
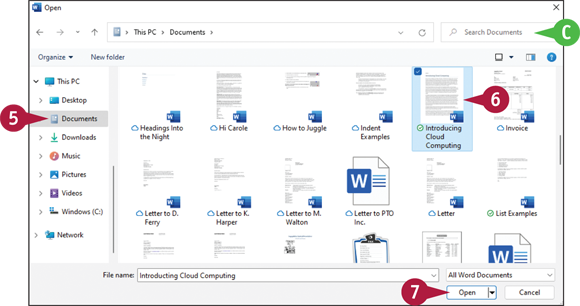
The Open dialog box appears.
If you chose the wrong place, you can search for the file by typing part of the filename or content here.
Click in the folder list to navigate to the folder containing the document you want to open.
Click the document you want to open.
Click Open.
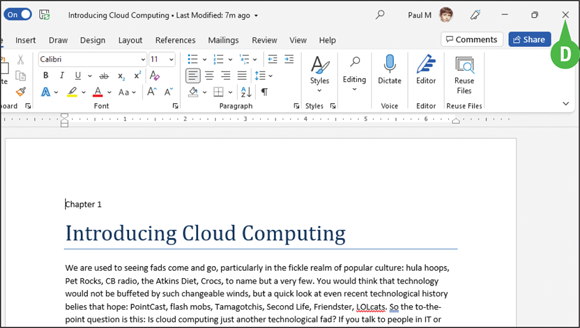
The file opens in the app window.
To close a file, click the Close button () in the upper-right corner. If you have not saved the file, the app prompts you to save it.
Print a File
If a printer is connected to your computer, you can print your Microsoft 365 files. For example, you might distribute printouts of a file as handouts in a meeting.
When you print a file, you have two options: You can send a file directly to the printer using the default settings, or you can open the Microsoft 365 app’s Print screen to change these settings. For example, you might opt to print just a portion of the file, print using a different printer, print multiple copies of a file, collate the printouts, and so on. (Printer settings vary slightly among Microsoft 365 apps.)
Print a File
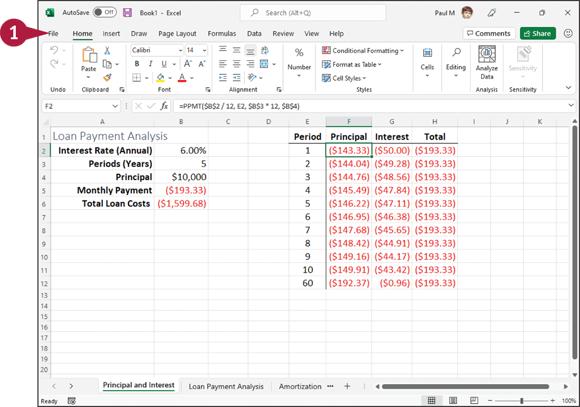
Click the File tab.

Backstage view appears.
Click Print.
You can specify the number of copies to print by clicking the Copies  .
.
You can choose a printer from the Printer drop-down list.
You can choose to print a selection from the file or specific pages using the available settings in the Settings list.
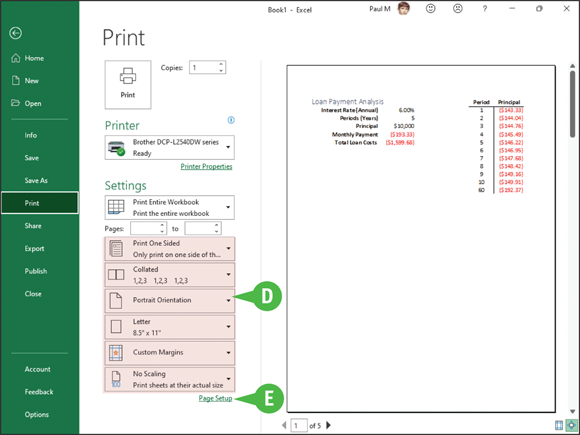
You can select additional print options under Settings. For example, you can choose from various paper sizes and to print in landscape or portrait orientation.
If you do not see the setting you want to change, click Page Setup to view additional settings.
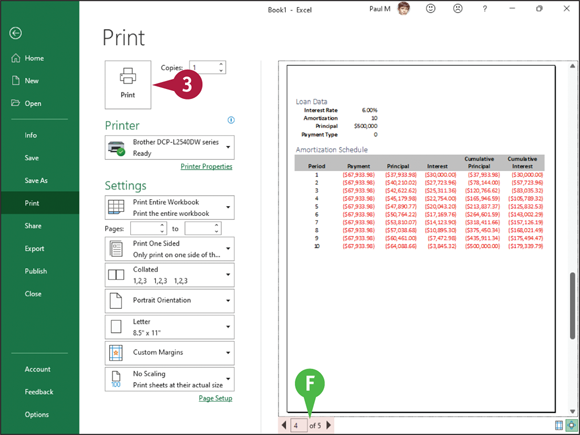
You can page through a preview of your printed file by clicking the previous arrow ( ) and the next arrow (
 ).
).
Click Print.
The Microsoft 365 app sends the file to the printer.
Select Data
You can select data in your file to perform different tasks, such as deleting it, changing its font or alignment, applying a border around it, or copying and pasting it. Selected data appears highlighted.
Depending on the app you are using, Microsoft 365 offers several different techniques for selecting data. For example, in Word, PowerPoint, Outlook, and Publisher, you can select a single character, a word, a sentence, a paragraph, or all the data in the file. In Excel and Access tables, you typically select cells. In OneNote, use the technique appropriate to the type of data you want to select.
Select Data
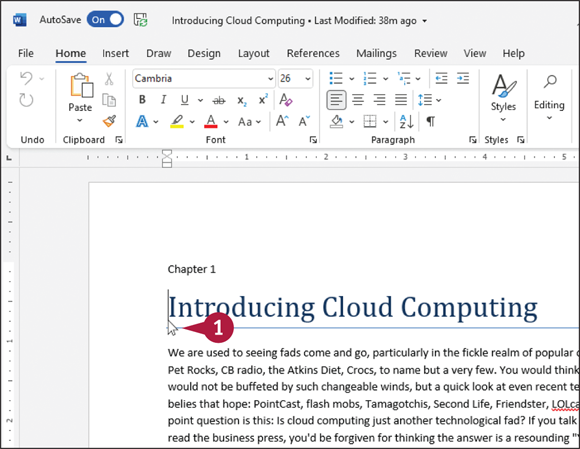
Select Data in Word, PowerPoint, or Publisher
Note: You can use this technique to select characters, words, sentences, and paragraphs.
Click to one side of the word or character that you want to select.

Drag the mouse () across the text that you want to select.
The app highlights the characters to indicate that they are selected.
To cancel a selection, click anywhere outside the text or press any arrow key on your keyboard.
Select Cells in Excel or Access
Click the cell representing the upper-left corner of the cells you want to select.

Drag the cell pointer across the cells you want to select.
The app highlights the characters to indicate that they are selected.
To cancel a selection, click anywhere outside the text or press any arrow key on your keyboard.